Sunday, 29 August 2010

Hats in Vogue

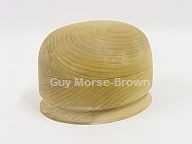
I am loving the cogs hat in this piece on milliners on Vogue.com. It appears to be by Harvy Santos (Harvash Hats) but I'm struggling to find much more than that - does anyone know any more?


This is the article and this is the gallery.
Saturday, 28 August 2010

Vogue 1190 - a truly beautiful dress

I’m very sorry to everyone out there that I haven’t been keeping this up to date – I’ve been away a bit and I’ve been so busy making stuff that I haven’t had a moment to sit down and write about it! I don’t know what it is, but I’m full of inspiration and passion for sewing all sorts of things at the moment.

So, first up is Vogue 1190. I haven’t fallen for a pattern this hard in, well, ever. I saw it on the McCall’s website as a new pattern and new on the spot that I would be making it for a friend’s wedding over the bank holiday weekend. I’d already blocked the base of a hat in a gorgeous turquoise straw (more on that another day) and didn’t have anything to go with it.

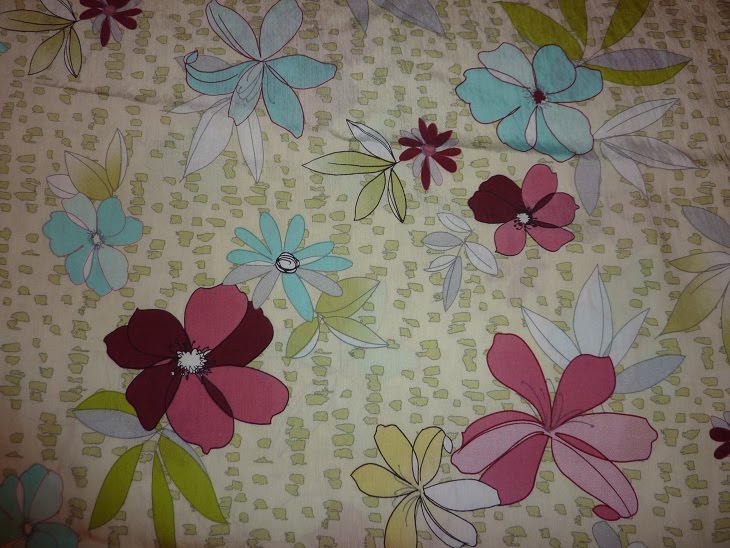
I popped up to my local(ish) John Lewis the next day to get this fantastic fabric. It’s 100% cotton, very fine and very soft. The drape is fantastic, but it does move a lot when you’re cutting and pinning. As it’s so fine I also picked up a pale blue lining fabric and blue wool suiting for the contrast belt.


I made up a toile of the bodice – this is a very very very nice pattern, the bodice just slid together and the fit was fantastic. I’d measured up at a size 12 on all measurements (rare for me to be so consistent) which may have something to do with that. The pleats in the front give the bodice fantastic definition and the back straps looked fantastic, even in curtain lining.


Lining was a little more complicated. I didn’t want to cause any lumps and bumps under the fine cotton so I basted the pattern pieces to the lining and treated as one. This was a bit of a mission and took a very long time to get right, but the result looks brilliant. It had the added benefit of giving a bit of structure to such a slinky fabric and I think that’s paid dividends in the shape of the bodice. The dress is made up using French seams throughout which gives the inside a very professional finish. The arm holes and back of the bodice are finished with bias binding. The instructions say to use the dress fabric, but I used purchased binding instead to give a little more structure to it, another roaring success (even if it doesn’t look quite so good on the inside, but no-one can see that other than me)

The frills on the shoulders were simple to put together and again they’re beautifully finished on the edges. The instructions don’t say to press them down, but when I’d added them I found them to be a bit bulky so pressed them. Looking at the photo on the packet I think they made the same decision. With a lot of similar pieces (frills and skirt pieces) I labelled everything with little stickers to make sure I didn’t get them the wrong way around. I’d certainly recommend this (even though I still managed to sew two of the frills on in the wrong order).


The skirt is a lovely shape – it curves out just right for the hips and falls beautifully below. It’s exactly the length I love at the moment – short but not indecent. Again, as with everything else in the pattern it all slots together perfectly. The seam to attach the skirt to the bodice is hidden in the contrast belt – there’s a real sense in this pattern that every attention has been made to the details that really matter. I’ve run the bottom through the overlocker but not taken it up yet – I want it slightly longer for the wedding (stitching doesn’t show on this pattern fabric) and will take it up afterwards.

Finally, the zip and the bow on the front. There’s a really clear tutorial for inserting an invisible zip which I wish I’d read several years ago. I don’t appear to have an invisible zipper foot on my new machine so I inserted by hand as usual, but there’s a few tips in there I’ll certainly be using in the future to make me brave enough to try it by machine again one day. The bow instructions are clear and although I’m no fan of bows it really looks right on the front of the dress. It’s clean, simple and smart.


I’ve spent several evenings prancing around din this – it fits like a dream, I feel gorgeous in it. It’s flattering in all the right places and those back straps are just astonishing. I’ve got some grey pinstripe suiting I bought to do McCall 5654 but never got the fit right on the toile – I think I’ll be making up a slightly longer version of this (without shoulder frills) for work.

Finally, the pattern says it’s easy. The instructions are very good for vogue, but I’d definitely say it’s one to try with a couple of other items under your belt as there’s quite a lot of different techniques (gathering, darts, pleats, lots of matching up, invisible zipper, French seams, making bias binding, stuff like that). I’ve seen a couple of others made up online and the results look fantastic in all sorts of fabrics so give it a go!

Sunday, 4 July 2010

Making a mini boater - tutorial part 2

Right now ladies and gentlemen, where were we? I believe we'd just blocked the sinamay crown and brim.

First take your sinamay off the block. The easiest way to do this is to cut the cling film and remove it on this, then remove the cling film from the hat. Cut the shape of the brim using the shape you originally identified (I used this plate) and cut the crown by measuring down a constant amount (mine's 2 inches)


Now put your crown onto your brim, with the crown on the outside if that's possible (it's difficult as you've used the same size block for both but stick with it). Try to line up the grain of the sinamay on the crown and the brim. Stitch the two together using a double thread. It goes against what you'd expect, but have the thread showing on the outside of the hat.


If you want to wire the brim, first stitch a bias strip of tarlatan to the edge (or a very small very thin bias strip that's smaller than the trimming you're going to use. Stitch the wire to this. It prevents too much hassle with the sinamay unravelling). I didn't wire this brim as it's so tiny it doesn't really need it. Then stitch your trimming (I've used matching navy cotton bias binding) to the edge of the brim.

(Oh dear, I didn't take a picture of that stage. You'll have to look at a later picture to see that).

Now we're onto trimmings. You can do whatever you want here, but I've made three leaves out of the same sinamay by cutting a leaf shape and rolling the edges. I've made another rose with the fantastic tutorial from Prudence Millinery to go with it. Finally, a bias strip of the same fabric as the flower has been used as a hat band. I've not pressed it too hard so that it sticks up and gives a bit of extra shape to the hat.


Finally we need to attach it to the head. For this hat, elastic would work, but I prefer a hairband. I make mine by bending millinery wire to the shape of my head. Normally I'd make a very small one to be attached with hair grips. I made it a bit bigger this time like a normal hair band but I'm not as keen on that actually.


Now stitch the hat secrurely onto the hairband. This always feels like it's going wrong until all four contach points are stitched and suddenly it's very secure and very comfortable.


All done...it takes a while, but it's so worth it. I wore it out tonight and it's a gem to wear.

In the last few photos it's sitting on the bag I made my mum for her birthday but it's bedtime now so you'll have to wait until later in the week to find out about that.

Thursday, 1 July 2010

Making a mini boater - tutorial part 1

I've had a few queries about how the mini boater was made (and I desparately want my own) so I've decided to make another one and show you how it's done...

I'm making this one with some sinamay I've been dying to use for ages rather than silk-covered buckram, but the concept of blocking it is much the same. The silk covering is a bit more complex - maybe I'll do another of those and show you as well - do you want it?

Ok, to begin with you need to think about the shape and size of the hat. I haven't got a mini boater block so I searched around the house for things that would do. The crown of the hat is blocked on a metal wine cooler and I've based the brim around a side-plate. I needed a flat piece of wood to block the brim on so I've used an old drawer. Here's what I based the hat on:


I covered the drawer and the cooler in cling film (just normal food grade stuff) to protect them from the water and to prevent the sinamay sticking to the blocks. I'm blocking both the brim and the crown in one go, but if you've not done much blocking before I'd suggest doing them separately (do the crown first, then when that's dry take it off and do the brim.


Next I cut out 4 pieces of sinamay. This was as I'm using a patterned sinamay - if I was using a normal one I'd cut out 6 pieces and if I were using buckram I'd cut two pieces. I took the size of my hat (remember the plate) and cut them out an inch or so bigger on each side.


Cut a hole in the middle of two pieces about an inch smaller than the crown block.


Now wet the first layer of sinamay (I use that spray bottle you may have noticed) so that it's nice and flexible. Pull it down over the block, making sure some of it still sticks up - you'll be attaching the crown to this later. Repeat with another layer of sinamay. With 'normal' sinamay this should be at 45 degrees to the first layer and a third should be in same direction as the first. To keep the pattern of mine I blocked just two layers in the same direction as one-another. Secure the centre with a hair band or some elastic.


Pin out four poles using millinery pins like these or household pins (you'll need a thimble to get them in the wood, but they work a treat). Stretch the sinamay flat, but remember to keep your shape.


Now use a few more pins to flatten the sinamay out across the wood. This should be nice and easy as you're just flattening it back to its original shape.


Now that that's done, onto the crown. You'll need the rest of the sinamay. Again get it nice and wet, then drape it over the top of your 'block'. Use another elastic or hair band to hold it in place as low down as you can without missing bits. If you're using three layers of 'normal' sinamay, the middle one should be at 45 degrees to the others.


Now gently ease the folds of sinamay. If you pull it on the bias, it will stretch that way allowing you to form it into the shape of the block. This also gives beautiful patterns which are great fun to play with - go on, have a go.


Now it's time to pour a glass of wine, pop on Film Four and watch the end of The Day After Tomorrow (oh no apparently not - my husband's come down and switched it over to Mock The Week based on the fact we've got The Day After Tomorrow on DVD...he may have a point.

I'll be back at the weekend with part 2.

Monday, 21 June 2010

New Blocks

Following on from the success of the 2/3 size top hat, and several people saying ‘I love it, but I’d rather have a bowler – I prefer something a little smaller’ I have just ordered a matching bowler crown


and a downturned brim to see if that gives some interesting finishes.


They’re going to be about a month as the lovely people at hatblocks.co.uk are closed for a few days for a holiday, but I’m already excited about getting them and working with them. My head is full of ideas :D

And here as a special treat to you is Alice in her top hat last week - doesn't she look amazing!

Sunday, 6 June 2010

A beautiful cream silk mini-boater


This hat is a commission for a friend of a friend. She wanted something in cream and sent me a few pictures of some styles she liked. It left a huge amount of the design up to me. This was very exciting and I'm really pleased with how it's turned out.

The hat has been formed by blocking a shape in Buckram, a stiff fabric which can be formed when wet and then dried to keep that shape. I didn't have any blocks in the shape I wanted so used a metal wine cooler that was the perfect size for the crown.

The two-part shape was stitched together and has been covered with a silk taffeta in a warm cream with a slight shot of gold. This method of forming a base and covering it is a traditional millinery method that dates back hundreds of years. The only modern touch was to do part of the stitching on my sewing machine. Most of the stitching has been done by hand. A head band has been used to finish the inside, and a band of millinery petersham (ribbon) has been used to give a professional finish to the silk hat itself.

The flowers are formed by cutting individual petals out of silk organza and then stitching them around a bud formed from millinery wire and cotton wool. Each petal is curled before attaching it, which is how the rose shape is created. Due to the size of the flowers on the hat, I stuck to two roses. They have been accentuated with curled goose feathers. The flowers were made using a tutorial from Prudence Millinery. Well worth the money if you fancy trying it - a beautifuly put together tutorial with hundreds of very clear photos.

Finally, the head band is made from millinery wire and bent to the shape of the head to give a really comfortable fit. Well here's some close ups of it for you to enjoy.


Thursday, 20 May 2010

27 Dresses

It’s been a while since I last set myself a sewing challenge (since I bought a coat from Karen Millen and challenged myself not to buy any clothes for a year to fund it and to make everything I needed. That worked great and I made it to the end, but then had such a big blow-out in Top Shop that in effect it was all for nothing!)

So, one week from today I turn 27. I’ve been excited about this one for years – 27 seems to be a very interesting year – it’s when all the rock stars die for one (Brian Jones, Jimi Hendrix, Janis Joplin, Jim Morrison, and Kurt Cobain to start with and wow look there’s a whole Wikipedia page devoted to it).

Let’s have a challenge related to this auspicious age then? The first thing that jumped to mind is 27 Dresses. I must admit I haven’t actually seen this film, (maybe because I’m bitter than I’ve NEVER been a bridesmaid and probably never will), but the title works well – it’s got 27 and it’s got dresses (which I’m LOVING at the moment). And 27 dresses in a year is just over one a fortnight – that sounds reasonable...(is it bad that I know I’ll be cursing this 6 months down the line?)

I might even watch the film at some point...

Wednesday, 5 May 2010

Fenwicks Hat - Update

Well, I did it. I delivered a hat to college on Tuesday morning before work to be viewed by the millinery buyer from Fenwicks (as discussed in this post). I’m so glad I re-made it – the little changes and little lessons I learned making it have produced a far superior hat to the original. I got some photos last night and I’ll put them up when I get home.

And now I’m waiting. I can barely think of anything else, I’m so nervous! All weekend I was fairly blasé about whether it got picked or not, but in the light of a new day it feels like I’ve left my soul on that table for someone to examine and accept or reject.

The other hats were AMAZING! Nothing like my little topper at all – mostly pastel colours, almost all made from sinamay. I’d have loved to have worn any one of them. There was a great selection of fascinators and full hats, some small and some HUGE. It’ll be really interesting to go to Fenwicks when the selection are displayed to see which of the hats made it.

Please keep your fingers crossed for me. I’ll let you know as soon as I find out...


Update: I heard back today - the hat hasn't been chosen. It was well received, but not what Fenwicks were looking for - it's not in line with their image and that sort of thing. A really good learning experience for me and I know what to go for next year.

Thursday, 29 April 2010

Website Relaunch

I have relaunched my website today on www.alisonclaire.co.uk - I especially love the gallery and the photo on the home page.

I want to thank my lovely husband for building it for me - he's worked so hard to get it set up to my exacting requirements. I hope you all like it as much as I do.

Monday, 26 April 2010

Oh to have a hat for sale on Bond Street...

I received an invitation from Kensington & Chelsea College last week to submit a hat for selection by Fenwicks of Bond Street’s millinery buyer for sale or return at Fenwicks.

I find this really exciting as this was how I found out about the course I’ve just finished. I saw a note in Metro about the display in Fenwicks of student work, went to see it and was so impressed I applied for the course the next day. I dreamed at the time of one of my hats being there on show a in a subsequent display. Imagine if that could happen one short year later!

Now, there’s 2 problems. One is that the selection will be made on the 4th. I’m away at scout camp all weekend so that means I’ll have to deliver my hat by Friday this week! The second is which hat to sell? They suggest unusual without being quirky or weird. The sort of hat a lady can wear to Ascot or a wedding or a society event. Something that takes in current trends yet also stands out.

There’s only one piece that can meet these criteria. The coursework hat. But to be honest, the one I made may be my pride and joy, but it’s just not good enough for Fenwicks. There’s a few little glitches and imperfections that make it not quite good enough to sell.

So this weekend I started blocking a copy. But with differences. So it’s better. I’m going to have the opening at the front rather than the back so it’s more visible. And it’s going to be a little deeper and less tall to let a little more light in. I’ve stiffened the felt a lot more so it’s more structured and strong. And I’m going to support the shape all the way around with the wire so it holds better. I’m also going to do the mirrors differently, but I’m not 100% sure what I mean by that.

Well, I blocked the crown three times this weekend. I just can’t do it perfectly enough. But I think I’m mostly there now. My husband’s been amazing and said he’ll do all the shopping and cooking so I can get it done. I’m very excited but very very scared.

The last three weeks of my millinery course

I’ve had this post half-written for over a month now – really need to get it finished!!! I blame the new job, but I’m all nicely settled in now so should have more energy in the evenings to make things and tell you about them!

The last few weeks of my millinery course flew by. Firstly I finished blocking the blue flower hat. I’d forgotten to put cling film on the brim block and this taught me why. The felt stuck to the block and as I pulled it off I found it to be stained and damaged by the well-used block. It’s not too bad, and it’s on the underside of the brim so I can still finish the hat off, but it was an essential lesson to learn. I wired the brim and put the two pieces together and I fell in love. I love the huge brim and how it looks with the flower on the crown.

I also blocked a large black felt hat as a one-piece based on these Chanel adverts: (oh boy do I LOVE this Chanel collection – how I wish I had that kind of cash, or the ability to recreate some of these beautiful dresses and jackets) The shape’s pretty close – now I just need to get the brim wired and add some black satin ribbon and I’m off.

I had my tutorial. I turned up with all my research and design work, beautifully presented in a pair of stylish black folders. I’d spent what felt like forever up to my elbows in pritt stick at the weekend getting it all written up and was glowing with pride. Caroline seemed really happy with what I’d done, and especially with the printouts of my blog, showing everything I’d learnt in the course. So a really successful tutorial until the end when she asked where the finished hat was. WHAT??? But this is the DESIGN tutorial!!! I thought we had until the end of the course, the next tutorial, to do that. “Yes”, she replied. “The course ends next week!!!”

No pressure then to get the hat made from scratch. I blagged that I’d got it started (honest, gov – no-one believes you) and headed home a little early to get it started. I raided my felt stash for a hood (yes, I hadn’t even ordered the stuff for it) and stiffened it that night before bed. I spent the next couple of days blocking, eternally grateful for the practice pieces I’d done as I zipped around all the mistakes I’d made before. It took me until the Sunday night before it was finished, but I was absolutely thrilled with the results. It’s exactly like the design with the silk lining, the mirrors twinkling inside and a sense of adventure.

Caroline was really impressed in the class and suggested I found a way of entering it for competitions. WOW!

We ended the course with a group meal which was a great giggle. While we were in the restaurant, one of the waiting staff came up and asked if she could show her friend in the kitchen my hat. I was so thrilled that other people like it too. Almost happy enough to make up for the fact that there’s no more millinery course until September!!!

Wow – what an epic tale! Well, here’s the hat for your enjoyment...


Tuesday, 20 April 2010

Sewing again

Well, I put sewing to the side to focus on my course for the first third of the year, but I’m back at it with a vengeance right now. I’ve got a pile of fabric, patterns, thoughts and ideas and not enough time in the day to get them made up. So the focus will start on work clothes (which are generally falling apart – very bad look).

So I made up a toile of McCall’s 5464.


I was surprised to measure up as a 10 throughout (I’m usually a 12 at least and never the same size top and bottom). I just made up the main pieces – one piece cut on the fold for the front and two pieces for the back – and I haven’t bothered to put a zip in (I’ll just get my husband to pin me into it). It went together pretty well really – the princess seams at the bust puckered a little – I’ll tack those for the real thing – and I sewed it to itself several times – not a pattern issue, incapable seamstress issue.

My husband was away when I made it up so I couldn’t get him to help me fit it properly, but when I pulled it on I got a very strong impression that my boobs and bum are not going to fit in this...and if they do I won’t be able to breathe, walk or sit down (but I think it makes my boobs look pretty good – sadly that’s not what pays the bills at work). I looked up some reviews on patternreview.com and they all loved the fitting so I checked to see if I’ve demonstrated some fumbled incapable measuring skills (or if my tape measure has inexplicably stretched). No, it seems fine. But a very very good excuse to learn to fit properly (another one and I still haven't managed it!)

The dress itself though is definitely worth any further work this takes. It’s gorgeous.

Friday, 9 April 2010

Another finished hat (finally)

Oh my, I’ve been very very bad at keeping this up to date, haven’t I!!!

Well, I’ve been very busy with the new job, and have been away almost every weekend. I’ve been writing the post about my last couple of weeks of my millinery course for about a month now, I promise to get it up in the next week (there, I said it, I have to now!)

So, it’s a completed hat post today. The purple cap from my new blocks. I’ve really been struggling with how to decorate this one as nothing seemed quite ‘right’ to me. I settled on a plaited strip of black felt across the front, which looks fantastically stylish but not really enough.

Then one day a clip I bought some time ago fell downstairs and landed next to the hat. The colours looked good so I tried attaching it and my word the hat went from good to jaw droppingly fantastic! I absolutely love it. I really adore the shape of this block – casual enough for real day-to-day wear, but structured enough to look that bit different to the baker boy caps that are everywhere. It’s quite a tough one to block as the peak rolls all the way under, so it involves a lot of shrinking, but it’s definitely worth it. I’ve already bought loads of different coloured hoods to try this on and I’m also thinking of seeing how it handles straw (not sure how to get it off the block though with that rolled edge...the felt was tough enough...)

Anyway, THREE yes get that, THREE random strangers complimented me on it today which has made me walk with my feet barely touching the ground. I'm thrilled.

And finally, I’ve decided that to fund my next millinery course (I spent considerably more on materials for the last one than I spent on the course fees themselves – it really adds up) I need to sell off some of my babies. So I’ll pop a post up as they appear on Etsy (if I can bear to be parted from them)


Friday, 26 March 2010

To those who inspire us

I’ve been struggling all week with how to write this post. And I want to dedicate it to everyone who’s ever inspired anyone.

Most people have had a teacher who inspires them, or someone out of school – maybe at work, maybe a friend or someone you’ve met. For me there was Mr Wallington, my Physics teacher in sixth form who turned a fairly academic subject into something real with impact everywhere around me, who inspired such questions as ‘how fast would you have to go for a red light to look green and could you use it as an excuse when caught speeding’ and ‘what exactly does 10 to the power of -23 look like’.

Then there was Toby, my line manager in my first ever Saturday job who was never afraid to muck in if we were short staffed, who always had time for people and always listened to what they had to say, yet was strong and strict and fair. With whom you always knew where you stood and you always knew where the line was and exactly what would happen if you crossed it. So you could get on and do your job without worrying about anything.

And more recently there was Andrew Bristow. The teacher at my first ever millinery course. The man who took ‘I wonder how hats are actually made and if I’d be any good at it’ and turned it into a passion for headwear and for couture sewing techniques. Whose enthusiasm for his work seeped into all his students, who challenged those who needed it and who supported those who were struggling. Who when he couldn’t understand my description of something I wanted to try said simply ‘well, you’d better make it then to show me’, giving me the belief that if I can see a hat I can make a hat (even if I can’t draw it).

And that’s where the tale becomes sad. I was searching the internet last weekend to see what sort of work the people who have taught me my millinery skills have produced, wondering what the styles were that were produced by the different characters when I came across this website, telling me that Andrew died on Boxing Day. Do have a read – the messages left by those who knew and loved him are beautiful. I’d like to leave my own one day, but I’m not sure what to write yet.

I always dreamed that one day I’d be making beautiful hats and I’d have some success as a milliner and I’d catch up with Andrew and tell him how he inspired me, how he was the fan that turned that spark of interest into a roaring fire. How at 25 years old and in his class I finally answered that primary school question of ‘what do you want to be when you grow up’, a question I’d never been able to answer before.


But I will be a milliner, and it will still be thanks to the inspiration of an amazing teacher, and I will never forget him. So raise a glass tonight to whoever it was who inspired you at any time in your life. Contact them and tell them. For these are the people who make our lives what they are and if we don’t tell them, how will they know the impact they had?

Tuesday, 16 March 2010

Earthwatch Mascot


You may remember that I made a bumble bee for a scientist in the Summer, (http://alisonsewing.blogspot.com/2009/09/project-15-bumble-bee.html & http://alisonsewing.blogspot.com/2009/10/project-15-bumblebee-photos.html) which he wore to a charity ball. Well, the organisation who held the ball contacted me a few months later asking if I could make them their own mascot. First off it was a dolphin, then a turtle, then we settled on a giant globe.

This was entertaining to design. They wanted the head of the wearer to be inside the globe, which meant that it couldn’t be suspended from the shoulders. It also needed to be light weight, hold its shape for multiple uses, all sorts of things that appeal to the Engineer in me. I spent quite a lot of time on google sketch-up working out how to do it.


The structure I came up with was based on school PE lessons – 6 hula hoops forming a sphere. This was surprisingly strong and very lightweight. This frame was covered in bubble wrap to give it a more spherical shape. To hold the globe in place when it’s being used, I attached a massive T-shirt to the base of the frame, allowing the frame to be suspended from the base rather than the top. These are supported by a few cords inside, but the majority of the strain is around the edge of the T-shirt. An added bonus here is that this makes the globe fairly comfortable to wear and (if you’re childish like me) you can jump up and down and the bounce in the T-shirt makes the globe jump about


Finally it needed to be decorated. I spent an age forming the blue felt around the shape to make a succession of larger and larger pleats and tucks to turn a 4m length of felt into a sphere. This was by far the most frustrating and fiddly part and the only part I’m not 100% happy with as there’s still some parts where it doesn’t sit as well as I’d like.

Then it was onto the continents. I bought a giant map of the world and attacked it with marker pen to identify approximate shapes rather than having lots of detail. Obviously, a flat map won’t translate exactly onto a globe so I had to expand things nearer the equator and reduce things nearer the poles. I made the continents up by drawing them freehand on the back of some really ugly Christmas wrapping paper and pinning them to the globe, redrawing or changing the shapes whenever it was required. Eventually I was happy with what I had and I cut the continents out of the green felt.

I’d planned to glue the continents on, but that just doesn’t sit with the way I do things so I ended up hand stitching them all. A massive job, but made all the more enjoyable by watching Pride and Prejudice at the same time (and the fact that I rather enjoy hand sewing). Occasionally Lizzie Bennett’s antics distracted me so much I sewed it to my jeans, but there were no major disasters.
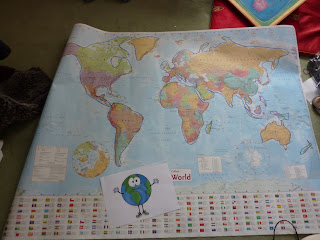
The picture I’d been given as a guide has arms with big white hands, massive eyes and a gorgeous smile. Again, I made these out of paper and pinned them on before cutting out two eye-holes and stitching several layers of white net behind them. (I thought four layers worked best as it made the eyes look quite opaque but didn’t affect the vision too badly.) This is one thing I’d have done differently. I cut out eye shapes from the net and then stitched them behind the eye holes. I should have cut the eye holes and just stitched a big rectangle of net behind as it slipped quite a bit and I had to re-stitch several parts. I added black felt ovals for the pupils and a big smile, also hand stitched.

The hands were made by cutting two massive hands out of white felt and stuffing them with wadding. I made mitten shapes out of white jersey (soft and stretchy) and inserted these, stitching the gloves together.

And finally I slip stitched the edges of the ‘sea’ together to hold the cover in place. It was picked up early this morning and I got a couple of pictures before it went away. It’s going to a conference tomorrow!!!

Sunday, 7 March 2010

I finished the 2/3 size top hat...

...and here it is!!!

The blocks are beautiful. The crown is made up of 5 pieces which screw together which means you can get the block out without stretching the hat. Everything's so beautifully made and fits together so perfectly. The crown was a horror to block - not sure if that's the fairly cheap felt I was using or the fact that the crown is so small, meaning I had to do a lot of shrinking (which is tougher than stretching for me).

Once I'd got that sorted, the brim was easier as I'd already shrunk the head fitting. It's not my neatest blocking attempt, but I was too excited about seeing how it turned out to take my time and do it properly! I've got a lovely baby pink fur hood to do it with next time so I hope that'll come out neater.

I wired the edge whilst babysitting for my friend's little boy (who was good as gold and let me get most of it done) then covered the wire with black velvet ribbon as I wanted something more luxurious-looking than petersham. I used petersham for the head fitting and added a thicker velvet ribbon band. It's held onto the head with elastic.

So, well done for reading, here's your reward - a photo...

Friday, 26 February 2010

2nd Millinery Course - Week 19

A week late again in the course updates – tut tut!!!

This week’s focus was feathers – we were shown a huge selection of different feathers of different grades, both naturally and artificially coloured. We were shown how to strip and shape the feathers and had a little go on our own. We also had a play with veiling, seeing how it would traditionally be added to a hat and stitching a simple veiled shape.

I took the flower crown off the block. It’s not as defined as I’d have liked, but I’m still pretty pleased with it. I removed the bottom of the felt and started to block a brim. I’m using a downward facing brim for the first time with felt. I started off with steam, but the teacher suggested I used an iron and some sprayed water and it improved things MASSIVELY. The felt stretched beautifully across the brim, making it far bigger than I’d expected I’d be able to manage (I was aiming for big and had picked quite a large block figuring I could stretch it as far as it would go)

I’d hoped to do more, but the heating was broken and everyone else was freezing so the class ended early.

Tuesday, 23 February 2010

More work on my new blocks

Oh I've been a busy little bee. I came straight home and blocked the purple felt on the cap block - I think I'll need to use bigger felts for that one as the brim rolls under. I just managed to stretch it far enough though. I cut down the red top hat crown and blocked the brim. I cannot wait to see them all put together!!! I think I'll be up nice and early tomorrow to take everything off the blocks before work. Maybe I can pop some head fittings into them on the train...

Anyway, the important part, here's a picture of my happy block family...

The blocks arrived

I know I should be on my way to work by now, but I just wanted to share my excitement that my beautiful blocks have arrived and I started blocking one of them this morning!!! (Way to get me out of bed!)


It was a lot harder than I expected - I think because of its small size - I had to shrink down the full size hood quite a bit to get rid of (most) the bumps - it may need some more work tonight to get the rest of them.


I don't think the hood's very colour-fast either - I've got bright red fingers!!!


Monday, 22 February 2010

A classic wedding present

I received an interesting request from a family friend recently regarding making something for their daughter's wedding. When she was little, she had a pair of really classic 70s inspired orange dungarees with a purple patch on the knee. Her father wanted to bring this up at the wedding, with props, but the dungarees were long gone.

So my wedding gift to them was to recreate these dungarees. The pattern I used was Burda 9828 http://www.habithat.co.uk/product_info.php/products_id/10086 made up in a size 12 months. They went together beautifully, I really enjoyed working with the orange corduroy. I lined them with a contrasting purple wool left over from my coat.

I hope they get used - it'd be fantastic to see them on a kid :D


/* GOOGLE ANALYTICS - tracking code */