Tuesday 28 December 2010

Happy Christmas - some hatty gifts from my generous family

I was as excited as a little girl on Christmas morning. My husband and I were hosting and cooking delicious venison lunch for both sets of parents as well as his brother and his brother's girlfriend.

But more than that, there were some gifts to give and my new hat blocks wrapped up under the tree waiting for me to see them for the first time. I'll get onto the gifts for giving in another post.

I've shown you the two I bought myself in this post.

Firstly the dome block: apologies for the shocking photos - must have been after lunch when I was full of wine and food!


Next, we have the exciting one - the mini beret - and it's even more beautiful than I imagined (even if I can't get a decent photo of it)


I can't show it on Ermintrude properly as the block is solid - I'd have to remove part of her head!!! But you'll see once I've finished using this block just how it sits on the head

Finally I received a tremendous surprise from my parents. My Dad had picked up the blocks for me as he was working in Luton one day. Apparently he was chatting to the guys at Boon & Lane and asked them what I'd really really want. They were making something and said it would be perfect. I unwrapped a rectangular box that was heavier at one end, looked inside the box and squealed 'oh my god it's an egg iron!' I was shocked and overjoyed. There's nothing like a magical surprise on Christmas Day.

So here it is, my very own egg iron. Expect many exciting projects to follow

Thursday 23 December 2010

My 100th post - getting excited about hat blocks again

Wow, just noticed on my dashboard that up until now I've posted 99 times!!!

I can't think of anything better for my 100th post than to share pictures of two of my new blocks (the ones my darling husband isn't giving me for Christmas - the ones I'm giving me for Christmas and I've given them to me early!!!)

Firstly I have to say they are absolutely beautiful. So much care and attention has been put into them - they've even stamped my name in them!!! The brim is suitably massive that I will be able to make anything on it and the shape of the crown is just what I asked for. They've also supplied a collar for the brim, which I completely forgot to ask for and which is charged as extra elsewhere.

Most importantly, here's some photos for you to enjoy - they're even better in real life - sitting next to me on the sofa begging to be stroked again...

These are made by Boon & Lane and I cannot reccommend them highly enough - lovely guys, beautiful blocks.


Wednesday 22 December 2010

My new blocks have been picked up today. I can’t wait to see them. I’ve ordered four from Boon and Lane in Luton. Rich and I had such an adventure when we went to order them – I’ve just checked back and I never told you about it!

I phoned the lovely guys at Boon & Lane on the Friday to ask about the process for ordering blocks. They suggested that seeing as we’re so local we popped down to see us and that they tend to open about 7:30 so we could go before work. We got on the train to Luton at about 6am on Monday morning. It had been snowing (the first time) and the sun wasn’t even thinking about coming up yet. The factory is on a little industrial estate near the station. We entered around the side and as soon as we walked through the door were welcomed by the sweet smell of sawdust.

I’ve never been anywhere like it and found it incredibly exciting. There were blocks EVERYWHERE, every available space was in use. We were shown around and then went up to what I guess you could call their sales room, shelves and shelves of samples. No wonder they don’t have photos of stuff up on their website – there’s just so much!

I was after some fairly basic stuff to give me the basis for making more commercial hats – a simple crown, a large brim, a dome (to take the fascinator/headpiece stuff to the next level) and something a little special for my Christmas present from Rich. The first three were easy, but picking something out from amongst the rest was nearly impossible – there was just too much choice! These things have to be seen to be believed – they’re all works of art in their own right. I eventually (with help from my wonderful husband) settled on a mini beret. I requested a few minor alterations (this bit taller, this bit smaller, etc) to make it 100% my own and then left that amazing place and ran off to work.

A few weeks later (they had said at the time they were very busy and might not be able to complete the order before Christmas) I got a phone call to confirm the order and to take payment and today my wonderful Dad has gone to pick them up (he is in Luton anyway so I don’t feel so bad, but thanks Dad, it’s really really appreciated). I can’t wait to see them (some of them, I guess I’ll have to wait until Christmas day for the others) – I’ve got so many ideas ready for them, including a black and white version of my yin and yang hat and a mini beret in teal inspired by the Gina Foster hat I fell in love with almost a year ago. I have the three working days off between Christmas and New Year and intend to spend most of that time blocking, stitching and enjoying my new babies.

Sunday 12 December 2010

Lots of secrets - just a quick peek

I’ve got a little further with the home-made hat block, but I’ll do a full update on that when it's actually started to look different. The last two weeks have been chocker block full of gift making and Christmas parties.

I’m really pleased with the Christmas cards Rich & I made together. We’ve embossed a star on the front and written Christmas wishes around it with felt pen. Not the most exciting cards I’ve ever made, but at least this time we made them all in an afternoon rather than making half a dozen, getting fed up and going to Woolworths (actually, what WOULD we do this year now Woolies is no more???)


But I’m afraid the rest of what I’ve been doing is a secret. All I can say is there’s a few people out there who are going to be very happy on Christmas day (I hope).

And on the hat front, I finally got an all-over sparkly sequined beret. We are joined at the hairline. I’ve wanted one of these for so long...and it goes so well with my coat...

Monday 29 November 2010

Inspiration - 20s Cloche

This weekend I watched Changeling. A very moving film that had both Rich & I hooked the whole way through. Do watch it if you haven’t seen it.

But it wasn’t just the film itself that caught my eye. It’s set in the 20s and 30s and I was HOOKED by the hats! The shapes of the cloches are divine. They hug around the hairline then flare out into tiny brims that set Jolie’s face off beautifully. Here's an example:


As I blinked my way through the tears, eager to know what happened next, I was getting fidgety. I NEED one of these cloches. As the credits rolled, I was straight onto the computer and into my millinery library to find out one thing. How do I make a hat block? I haven’t wanted something so specific since the day I tried on Gina Foster’s Mitsouko hat [see here]. I found some information and started it off by blocking three layers of buckram onto Ermintrude.


I’m going to combine lots of things I found online and in books:

1. I’m blocking the basic shape of the crown in buckram. I’ll get the head-line right first

2. I’m going to wire this shape. Some of the books on www.vintagesewing.info suggest heavy wiring of buckram shapes so that seems a good starting point

3. I’m going to add the cute little brim in buckram & wire that. This will be done freehand I think

4. I’m going to fill the shape with expandable foam (the MOST fun DIY activity made more fun by being hatty) – check this link for where I got this one from

5. I’ll carve the remaining foam away to give myself a rolled brim to pin to

6. I’ll use polyfilla to build up the shape where it needs it (I think it will around the back as I’ve blocked on a polystyrene head rather than a block and it is more shaped than I want)

7. I’ll cover it to give a smooth finish. I’m not sure with (anyone who reads this and has done this before, please please give me tips.) I’m guessing papier mache or stretchy fabric. I don’t want to increase the size by much.

8. I’ll finish it and varnish it to make it waterproof

9. I’ll block a hat on it and call myself either a FOOL or a GENIUS!

So, not much work to this one then...I’ve struggled to find decent information on how to do this properly – if anyone reading this knows of good sources of information please let me know. Or if you have any experience you can add to save me messing this up entirely. I think this could be a long project so I’ll keep you updated on how it’s going.

I can’t wait for my cloche!!!

Thursday 25 November 2010

Happy St Catherine's Day

Well, it's St Catherine's Day again (has it really been a whole YEAR???)

For those unfamiliar with the day, custom in France would be for unmarried women who were 25 years of age to pray for husbands and to honour those who've passed that age who are not yet married (although I married at 24, I'm relieved things have changed - I consider myself a child bride - imagine being 'past it' by that age!)

The millinery angle is that friends and families of the "Catherinettes" (the girls praying for some hot tottie) would make them special hats and they'd parade to St Catherine's statue. Because of this, St Catherine's day is still celebrated by Milliner's across the world.

And as for me? I did NOT realise we were that far through the year already, but here's a great link for you to peruse at you leisure

St Catherine's day parade in Paris, 1934 (video)

Sunday 21 November 2010

Vogue 8465 - 2010's coat

Firstly, I'll admit that I still haven't put the buttons on my 2009 coat, but it looks so damned good with a belt! Don't think I've done a photo shoot of it yet either and I've been wearing it for a year!!! Well, here's the only decent photo I actually have of it!


And if you want to read about that one, blog posts are here and here.

This time, the pattern is Vogue 8465 - view C - the one in red.

I picked up some gorgeous fabric from down Goldhawk Road - black wool with silver spots on one side and silver with black on the other. Fantastically warm with a beautiful drape. As the main fabric was so soft and slinky, I decided on this beautiful taffeta to line it with the intention of giving it a little more body.


I got a roll-end of the lining so ended up getting a metre extra to match the silver to line the underside of the collar and a metre to line the sleeves (ok, so I didn't actually work out what I needed when I got the extra and had to get two lots because it didn't quite fit on a single metre!)

The coat itself, although it's taken me a month of evenings and weekends to do hasn't been overly difficult and the fit and shape are beautiful. I measured exactly to the pattern size 12 so didn't have to do any alterations. I made a toile of the bodice to check. Before putting the buttons and snappers on, I tried it by just pinning it where I thought it would go and it seemed very bulky round the waist. But once the internal support from the poppers was in place it actually fit really well. I'm now really glad I didn't make any changes to the waist line (I ended up chickening out)

There's some design features on this coat that I really love - the little loops for the buttons are brilliant, as are the buttons I found


But basically, I'm thrilled to bits with it. Rich took me out and we got some photos of it this evening.


And here's some pictures of the construction process. If you have any questions, just drop me a line - I'd really recommend this pattern.


Created with flickr slideshow from softsea.

Wednesday 27 October 2010

Finished Sinamay Headpiece

Well, here it is - my first output from the Millinery Trimmings Course at London College of Fashion.

The hat is made of three sinamay pieces, each blocked on a dome block, wired and edged with hand-made bias binding. The top two pieces are based on the 'ying yang' symbols, with the tails 'popped' up. There are actually three colours of sinamay used on each - dark blue on the front, light blue on the back and green on the edging.

The two pieces have been mounted on a headband formed in the same way - blocked and wired sinamay. The prongs holding it to the head are formed to resemble the tails of the other pieces and the strength and shape keeps the whole piece sturdy on the head.

A single ostrich feather has been curled and formed to wind in and out of the holes in the symbols, following the curves as it majestically towers over the top.

Finally, a comb on the inside holds the whole thing sturdy.

I am so happy with this hat. It's a really different direction for me and I'm in LOVE. I hope you like it too.

Tuesday 26 October 2010

More exciting new stuff

I'm very sorry for being so bad at coming and showing you all what's going on, but I'll make up for it by posting some photos at the weekend.

I've been taking the 'Millinery Trimmings & Fascinators' course at London College of Fashion and all my blogging time has been taken up by homework for this!

Our tutor is Thomas Von Nordheim and his teaching style really suits me. We're doing a sinamay and a covered buckram headpiece over the seven week course and although the first few lessons covered stuff I've done before, Thomas is fantastically approachable and really helpful, especially on a personal level.

I wanted to do the course because I feel that where my hats are now of a great standard and beautiful shapes, I really struggle with how to finish them. I see all these hats covered in feathers and 'frou frou' and feel like I should do the same. Thomas has listened to my style and my ideas and helped me to understand how I can do trimmings my own way. He's helped me to develop an amazing sinamay headpiece which I finished tonight. It's got a feather, but just one statement one and it's fantastic (can you tell I'm in love). This course has been so much more than I dreamed it could be and I really feel like I've found the next step in my hat making now.

Sunday 3 October 2010

Something else I've been working on

As mentioned in this post putting together a little autumn/winter collection as this is the time of year that I start to really enjoy hats.

This one's a 2/3 size bowler hat in a thick black wool felt with white contrast stitching. The flower is made from the same felt with contrast stitching again.

There's a few little mistakes on this one, but I'll forgive myself that as it's a prototype. I'm naming her 'Jeni' after the friend who inspired her.


Sunday 26 September 2010

Sneak peak of my Autum/Winter Collection

I've been busy putting together an autumn/winter collection for 2010. I've had so much fun designing stuff, finding fantastic fabric and trying out lots of new techniques.

I've been working on two fabric patterns - a baker boy cap and a beret. I think these are the most wearable and classic fabric hat styles and suit most people.

So here's a sneak peak - this is the 'Daisy' baker boy cap. I LOVE this fabric and it's toasty warm ready for the depths of winter. I also love the way the hat flops to the side so stylishly. Check back for the whole range in the next few weeks.


(Apologies for the poor quality photo - it's taken on my phone. I'll get some decent ones soon.)

Sunday 29 August 2010

Hats in Vogue

I am loving the cogs hat in this piece on milliners on Vogue.com. It appears to be by Harvy Santos (Harvash Hats) but I'm struggling to find much more than that - does anyone know any more?


This is the article and this is the gallery.

Saturday 28 August 2010

Vogue 1190 - a truly beautiful dress

I’m very sorry to everyone out there that I haven’t been keeping this up to date – I’ve been away a bit and I’ve been so busy making stuff that I haven’t had a moment to sit down and write about it! I don’t know what it is, but I’m full of inspiration and passion for sewing all sorts of things at the moment.

So, first up is Vogue 1190. I haven’t fallen for a pattern this hard in, well, ever. I saw it on the McCall’s website as a new pattern and new on the spot that I would be making it for a friend’s wedding over the bank holiday weekend. I’d already blocked the base of a hat in a gorgeous turquoise straw (more on that another day) and didn’t have anything to go with it.

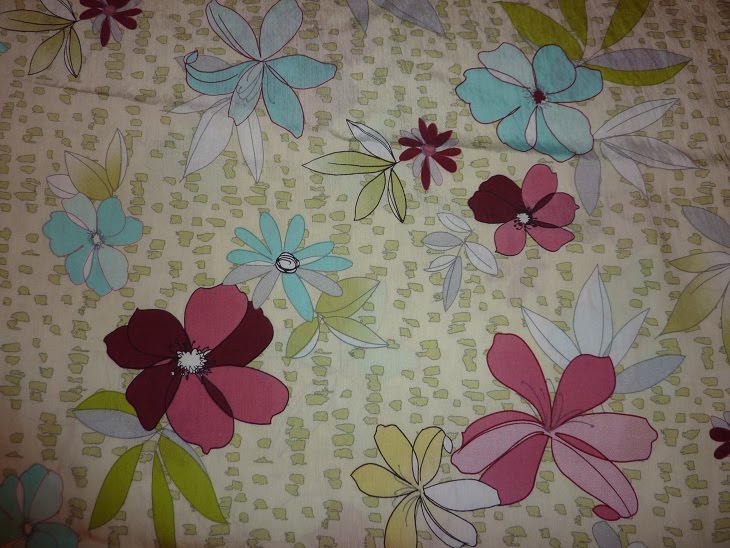
I popped up to my local(ish) John Lewis the next day to get this fantastic fabric. It’s 100% cotton, very fine and very soft. The drape is fantastic, but it does move a lot when you’re cutting and pinning. As it’s so fine I also picked up a pale blue lining fabric and blue wool suiting for the contrast belt.


I made up a toile of the bodice – this is a very very very nice pattern, the bodice just slid together and the fit was fantastic. I’d measured up at a size 12 on all measurements (rare for me to be so consistent) which may have something to do with that. The pleats in the front give the bodice fantastic definition and the back straps looked fantastic, even in curtain lining.


Lining was a little more complicated. I didn’t want to cause any lumps and bumps under the fine cotton so I basted the pattern pieces to the lining and treated as one. This was a bit of a mission and took a very long time to get right, but the result looks brilliant. It had the added benefit of giving a bit of structure to such a slinky fabric and I think that’s paid dividends in the shape of the bodice. The dress is made up using French seams throughout which gives the inside a very professional finish. The arm holes and back of the bodice are finished with bias binding. The instructions say to use the dress fabric, but I used purchased binding instead to give a little more structure to it, another roaring success (even if it doesn’t look quite so good on the inside, but no-one can see that other than me)

The frills on the shoulders were simple to put together and again they’re beautifully finished on the edges. The instructions don’t say to press them down, but when I’d added them I found them to be a bit bulky so pressed them. Looking at the photo on the packet I think they made the same decision. With a lot of similar pieces (frills and skirt pieces) I labelled everything with little stickers to make sure I didn’t get them the wrong way around. I’d certainly recommend this (even though I still managed to sew two of the frills on in the wrong order).


The skirt is a lovely shape – it curves out just right for the hips and falls beautifully below. It’s exactly the length I love at the moment – short but not indecent. Again, as with everything else in the pattern it all slots together perfectly. The seam to attach the skirt to the bodice is hidden in the contrast belt – there’s a real sense in this pattern that every attention has been made to the details that really matter. I’ve run the bottom through the overlocker but not taken it up yet – I want it slightly longer for the wedding (stitching doesn’t show on this pattern fabric) and will take it up afterwards.

Finally, the zip and the bow on the front. There’s a really clear tutorial for inserting an invisible zip which I wish I’d read several years ago. I don’t appear to have an invisible zipper foot on my new machine so I inserted by hand as usual, but there’s a few tips in there I’ll certainly be using in the future to make me brave enough to try it by machine again one day. The bow instructions are clear and although I’m no fan of bows it really looks right on the front of the dress. It’s clean, simple and smart.


I’ve spent several evenings prancing around din this – it fits like a dream, I feel gorgeous in it. It’s flattering in all the right places and those back straps are just astonishing. I’ve got some grey pinstripe suiting I bought to do McCall 5654 but never got the fit right on the toile – I think I’ll be making up a slightly longer version of this (without shoulder frills) for work.

Finally, the pattern says it’s easy. The instructions are very good for vogue, but I’d definitely say it’s one to try with a couple of other items under your belt as there’s quite a lot of different techniques (gathering, darts, pleats, lots of matching up, invisible zipper, French seams, making bias binding, stuff like that). I’ve seen a couple of others made up online and the results look fantastic in all sorts of fabrics so give it a go!

Sunday 4 July 2010

Making a mini boater - tutorial part 2

Right now ladies and gentlemen, where were we? I believe we'd just blocked the sinamay crown and brim.

First take your sinamay off the block. The easiest way to do this is to cut the cling film and remove it on this, then remove the cling film from the hat. Cut the shape of the brim using the shape you originally identified (I used this plate) and cut the crown by measuring down a constant amount (mine's 2 inches)


Now put your crown onto your brim, with the crown on the outside if that's possible (it's difficult as you've used the same size block for both but stick with it). Try to line up the grain of the sinamay on the crown and the brim. Stitch the two together using a double thread. It goes against what you'd expect, but have the thread showing on the outside of the hat.


If you want to wire the brim, first stitch a bias strip of tarlatan to the edge (or a very small very thin bias strip that's smaller than the trimming you're going to use. Stitch the wire to this. It prevents too much hassle with the sinamay unravelling). I didn't wire this brim as it's so tiny it doesn't really need it. Then stitch your trimming (I've used matching navy cotton bias binding) to the edge of the brim.

(Oh dear, I didn't take a picture of that stage. You'll have to look at a later picture to see that).

Now we're onto trimmings. You can do whatever you want here, but I've made three leaves out of the same sinamay by cutting a leaf shape and rolling the edges. I've made another rose with the fantastic tutorial from Prudence Millinery to go with it. Finally, a bias strip of the same fabric as the flower has been used as a hat band. I've not pressed it too hard so that it sticks up and gives a bit of extra shape to the hat.


Finally we need to attach it to the head. For this hat, elastic would work, but I prefer a hairband. I make mine by bending millinery wire to the shape of my head. Normally I'd make a very small one to be attached with hair grips. I made it a bit bigger this time like a normal hair band but I'm not as keen on that actually.


Now stitch the hat secrurely onto the hairband. This always feels like it's going wrong until all four contach points are stitched and suddenly it's very secure and very comfortable.


All done...it takes a while, but it's so worth it. I wore it out tonight and it's a gem to wear.

In the last few photos it's sitting on the bag I made my mum for her birthday but it's bedtime now so you'll have to wait until later in the week to find out about that.

Thursday 1 July 2010

Making a mini boater - tutorial part 1

I've had a few queries about how the mini boater was made (and I desparately want my own) so I've decided to make another one and show you how it's done...

I'm making this one with some sinamay I've been dying to use for ages rather than silk-covered buckram, but the concept of blocking it is much the same. The silk covering is a bit more complex - maybe I'll do another of those and show you as well - do you want it?

Ok, to begin with you need to think about the shape and size of the hat. I haven't got a mini boater block so I searched around the house for things that would do. The crown of the hat is blocked on a metal wine cooler and I've based the brim around a side-plate. I needed a flat piece of wood to block the brim on so I've used an old drawer. Here's what I based the hat on:


I covered the drawer and the cooler in cling film (just normal food grade stuff) to protect them from the water and to prevent the sinamay sticking to the blocks. I'm blocking both the brim and the crown in one go, but if you've not done much blocking before I'd suggest doing them separately (do the crown first, then when that's dry take it off and do the brim.


Next I cut out 4 pieces of sinamay. This was as I'm using a patterned sinamay - if I was using a normal one I'd cut out 6 pieces and if I were using buckram I'd cut two pieces. I took the size of my hat (remember the plate) and cut them out an inch or so bigger on each side.


Cut a hole in the middle of two pieces about an inch smaller than the crown block.


Now wet the first layer of sinamay (I use that spray bottle you may have noticed) so that it's nice and flexible. Pull it down over the block, making sure some of it still sticks up - you'll be attaching the crown to this later. Repeat with another layer of sinamay. With 'normal' sinamay this should be at 45 degrees to the first layer and a third should be in same direction as the first. To keep the pattern of mine I blocked just two layers in the same direction as one-another. Secure the centre with a hair band or some elastic.


Pin out four poles using millinery pins like these or household pins (you'll need a thimble to get them in the wood, but they work a treat). Stretch the sinamay flat, but remember to keep your shape.


Now use a few more pins to flatten the sinamay out across the wood. This should be nice and easy as you're just flattening it back to its original shape.


Now that that's done, onto the crown. You'll need the rest of the sinamay. Again get it nice and wet, then drape it over the top of your 'block'. Use another elastic or hair band to hold it in place as low down as you can without missing bits. If you're using three layers of 'normal' sinamay, the middle one should be at 45 degrees to the others.


Now gently ease the folds of sinamay. If you pull it on the bias, it will stretch that way allowing you to form it into the shape of the block. This also gives beautiful patterns which are great fun to play with - go on, have a go.


Now it's time to pour a glass of wine, pop on Film Four and watch the end of The Day After Tomorrow (oh no apparently not - my husband's come down and switched it over to Mock The Week based on the fact we've got The Day After Tomorrow on DVD...he may have a point.

I'll be back at the weekend with part 2.
 
/* GOOGLE ANALYTICS - tracking code */