Showing posts with label sewing. Show all posts

Sunday, 21 November 2010

Vogue 8465 - 2010's coat

Firstly, I'll admit that I still haven't put the buttons on my 2009 coat, but it looks so damned good with a belt! Don't think I've done a photo shoot of it yet either and I've been wearing it for a year!!! Well, here's the only decent photo I actually have of it!


And if you want to read about that one, blog posts are here and here.

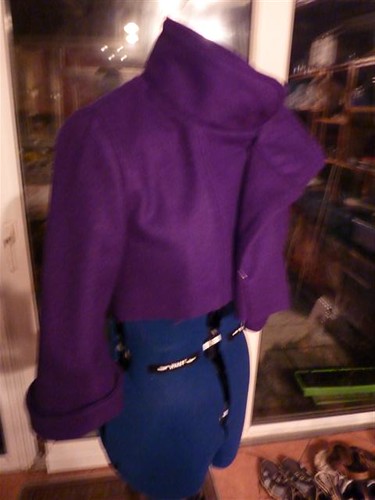
This time, the pattern is Vogue 8465 - view C - the one in red.

I picked up some gorgeous fabric from down Goldhawk Road - black wool with silver spots on one side and silver with black on the other. Fantastically warm with a beautiful drape. As the main fabric was so soft and slinky, I decided on this beautiful taffeta to line it with the intention of giving it a little more body.


I got a roll-end of the lining so ended up getting a metre extra to match the silver to line the underside of the collar and a metre to line the sleeves (ok, so I didn't actually work out what I needed when I got the extra and had to get two lots because it didn't quite fit on a single metre!)

The coat itself, although it's taken me a month of evenings and weekends to do hasn't been overly difficult and the fit and shape are beautiful. I measured exactly to the pattern size 12 so didn't have to do any alterations. I made a toile of the bodice to check. Before putting the buttons and snappers on, I tried it by just pinning it where I thought it would go and it seemed very bulky round the waist. But once the internal support from the poppers was in place it actually fit really well. I'm now really glad I didn't make any changes to the waist line (I ended up chickening out)

There's some design features on this coat that I really love - the little loops for the buttons are brilliant, as are the buttons I found


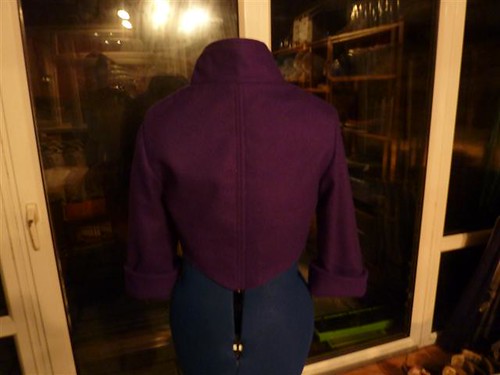
But basically, I'm thrilled to bits with it. Rich took me out and we got some photos of it this evening.


And here's some pictures of the construction process. If you have any questions, just drop me a line - I'd really recommend this pattern.


Created with flickr slideshow from softsea.

Monday, 22 February 2010

A classic wedding present

I received an interesting request from a family friend recently regarding making something for their daughter's wedding. When she was little, she had a pair of really classic 70s inspired orange dungarees with a purple patch on the knee. Her father wanted to bring this up at the wedding, with props, but the dungarees were long gone.

So my wedding gift to them was to recreate these dungarees. The pattern I used was Burda 9828 http://www.habithat.co.uk/product_info.php/products_id/10086 made up in a size 12 months. They went together beautifully, I really enjoyed working with the orange corduroy. I lined them with a contrasting purple wool left over from my coat.

I hope they get used - it'd be fantastic to see them on a kid :D


Saturday, 23 January 2010

Productive day - and helping a friend

I have been sewing ALL DAY!!! I got up early and got started on my mum's hat, which I've finally finished (well, I want to add a button or something to the middle of it to hide where the feathers join, but mum's gone out to get that today.) It looks fantastic on her and really goes with her outfit. I'll get a picture of it all together next weekend at the wedding :D

Next job is something I really really want to tell you about, but it's a big secret, also for the wedding next weekend...so we'll all just have to wait...

Whilst working on my hat for the wedding, the felt and sinamay one, a friend called and asked if I could help her make a top for a burns night party tomorrow. She'd bought a metre of tartan fabric and had no idea where to start.

I really enjoyed helping her out creating this. We took a dress pattern and shortened it to make a long top. I especially like how we added a bias strip round the bottom, which gives it a really funky look. I really enjoyed working with someone - I normally sew alone. And she did a fantastic job of it, especially as she'd never done anything like it before.

Wednesday, 4 November 2009

Project 16 - Purple Coat - Update

Well, I wore it to work today - with a belt as it doesn't have buttons yet, but what's the harm in that!!!

I finally worked out, after spending all last night swearing at snapped threads, that if I put the sparkly thread in the bobbin it works beautifully!!! I'd had enough by then though and decided to put it away for the night before I did something stupid.

So, what have I done? I finished off the skirt (the instruction that was completely incomprehensible on Sunday night worked really well with a little playing last night - I just pinned it and played with it until it looked right).

Then I stitched the skirt to the bodice. Again I didn't really understand the instructions so I stitched it to the outside (wool) and then hand stitched the lining onto it, which gave a beautiful finish (and an opportunity to get more hand stitching practice whilst watching a fascinating programme on black holes). I think that's roughly what the instructions said, but I get the impression that whoever was writing them was getting a bit bored of doing it towards the end!!! I'm going to unpick the sleeve linings and do them the same way as it looks really smart.

Then the last thing I did was the top stitching - and a lot of swearing. It was only in testing the button holes on scraps that I tried putting the sparkly thread in the bobbin and it came out PERFECTLY and didn't snap!!! Wish I'd worked that one out earlier, but every experience is a learning experience.

I took a few photos of the bodice last night and will get some photos of the whole thing tonight and put them all up soon.

I'm so unbelieveably proud that I've made a real life coat!!! I'm so proud of how professional it looks - the pleats especially - and the fit of the coat is gorgeous.

Monday, 2 November 2009

Project 16 - Purple Coat

Ok, so my first coat – and I picked up McCall 5513 over the summer in one of the $3 sales (BARGAIN!) I’ve got a few smart coats and an old battered leather jacket, but I really like the current styles and this one is my favourite.

I’d already decided not to do the appliqué on the back – it’s just not my style and to do some funky contrasting stitching on the seams. I picked up some fairly cheap purple wool coating (a GORGEOUS) colour along with some red lining from Fabric Land. I was going to face it in either lighter purple or red, but when I unpacked the purple I realised I’d been sold 150cm wide when I was told it was 115cm wide so I had loads too much so I decided to self-face. I also bought a set of massive red shell buttons (costing almost as much as the fabric).

I got it all cut out this week, then after spending most of Saturday re-arranging and cleaning my sewing room I got started on Sunday morning. The bodice went together like a dream. All the easing of the shoulder seams and sleeves slipped into place so easily. I officially love working with wool!!! I did all the topstitching in sparkly red thread which is very exciting (although it does snap at the most inopportune moments). I didn’t change anything really except to topstitch most of the seams (only a select few are stitched in the design and that looked a bit random to me) and to machine the lining onto the shoulder seam rather than hem it and slipstitch it. I’m going to get some red binding for that seam to smarten it up, but it feels fine.

Dark fell (so early – since when has it become NOVEMBER?) and after dinner I got onto the skirt. Now that’s more complicated. First are the dozen or so pleats, the only section so far where the instructions are really lacking. All it says is pleat as shown in the picture. I’d never done pleats before, but with a little help from a book I got them sorted and looking rather smart.

The bottom has to be gathered to about ¼ of its original size which with the wool fabric is hard work. The instructions say to run two lines of stitching along the bottom and use those to gather, but my thread just kept snapping. I ended up unpicking that and, following a review I’d read on patternreview.com I found some thick elastic, cut it to the right size and sewed it on stretched out. Even then I had to manually “squidge” the wool as it went through the machine as it was longer than the full stretch of the elastic!!! Eventually (I must have been working on that seam for 2-3 hours – the first difficult part of the coat) I got it done and stitched to the lining and headed off exhausted to bed. I was really disappointed I couldn’t finish it yesterday (I wanted to wear it today), but I’ll do my best to get it done on Tuesday night. It looks like there’ll be a bit more gathering at the top of the skirt but I’m on instruction 54 of 63 so I’m almost there...
 
/* GOOGLE ANALYTICS - tracking code */