I am loving the floaty chiffon tops at the moment (although not when people wear them without a top underneath AT WORK and you have to sit and try not to look at their bra in a meeting...) - they're so elegant, easy to wear and smart.
So this morning, I decided to turn one of the beautiful printed fabrics in my stash into a stylish floaty top.
It was really easy to make so I decided to make a little tutorial of how I put it together.
I used 1m of fabric off the market. This is a cheap plastic georgette with a gorgeous print. I think it cost me about £2 or £3 a metre.
I folded it in half lengthways and then cut a slit in the middle of the folded side for a neckline. I cut it 10" long. Do check at this point that you can fit your head through the slit - mine only just fits!!!
I next trimmed 2" off each side of the fabric - this is to form the belt
I trimmed 12" off the end of each of these strips to bind the neck. I know I should make binding on the bias, but because the neckline's a slit I didn't worry about that. If your neck slit is longer than the 10" I used, make your strips 2" longer than your slit.
These two 12" strips form the binding for my neckline. I didn't make the binding up in advance as there's no way this fabric will hold a crease. What I did was to turn my top so the wrong side was facing out and pin a strip along the front and back edges of the slit.
This is the time to point out that you don't need to do this on a mannikin - I have used that to make the photos clearer.
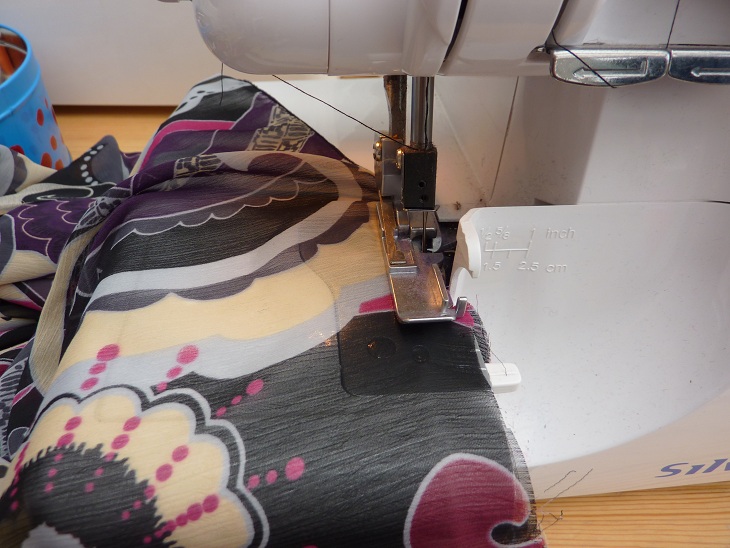
Now stitch this edge with a normal 1.5cm seam allowance. As you go around, reinforce the corners of the slit by sewing a big rectangle (like a letterbox around you slit).
When you reach the edges of the strips, turn the ends over to give a nice neat finish
Now we need to hide those edges (in the following pictures the top's been turned right way out again although you can barely tell the rights and wrongs from these photos). Turn the strip over the raw edges then tuck the edges of it under to give a nice clean edge. If your fabric's like mine you are going to need a LOT of pins to hold this in place.
You can stitch this on the machine, but I prefer to do this by hand and hide the stitches.
At the corners, reinforce it by strongly stitching the two pieces of binding together
If your fabric will take it, you can press your neckline, but mine won't and I rather like the finish this gives
Next job is the belt. Pin the remaining fabric strips together
Stitch down one side and reinforce the end. Cut the thread from the machine a little longer than the whole belt. Lay this along the seam you've done and enclose it with the other seam. This allows you to pull the belt inside out really easily (sorry, I forgot to get photos of this bit). You can trim the seams before pulling through, but I decided I wanted to carry on that rounded look from the neckline so left all the fabric in there to create bulk. Finish the ends off neatly.
Either put your top on the manikin or on yourself and mark with pins the point directly below the arm pit a little lower than the natural waist line.
Take it off and check everything's lined up right. Replace the pin with a safety pin. Mark the same on the other side. Now check that you can get the top on and off with the pins in place. If not, move them out a little until you can.
Create a button hole where each of the pins is and open it up. Pop the top back on the mannikin or on you and tie the belt around it, lacing it through the button holes
You'll be able to see that your hem at the bottom is looking a bit wobbly (ok a lot wobbly)
Trim your hem to make it all straight (if you're wearing it get someone else to do this for you). I did this by eye. Don't worry too much about how neat you do it, we're going to sort that out in a minute.
Now take it off, lay it on the floor and try not to wince at how messy it looks - that's absolutely fine
As you can see, mine's very different on the left and right sides. Fold it in half down the middle, line everything up really carefully and neaten the edges up into a nice curve. This is where the see-through fabric comes into its own - you can see all the layers at once.
Open it out and make any adjustments you need to.
Finally, if you have an overlocker (serger) or the appropriate foot for your sewing machine, finish the edges off with a rolled hem. If you don't a zigzag stitch will do fine. And if you're really keen you could hand-roll the edge or do something else fantastic like that.
And that really is all there is to it. This took me less than two hours this morning to make, and that included the time spent on working out measurements, design and all that. This is a really easy project and I think it looks brilliant. I've been wearing it all day and it's fantastic to wear.