Tuesday 24 November 2009

2nd Millinery Course - Week 10

Another week of tutorials and freedom to play about as much as we wanted to. When the teacher had been talking about making hats with crowns and brims, she’d said that it’s possible to block the crown and brim together rather than making a two-piece and sewing it together. Intrigued (as ever) I was determined to give it a go.

First off, I must admit that as the teacher was busy doing tutorials I went for the “bodger” approach and don’t know if what I did was right. We’ll have to see next week if it’s worked.

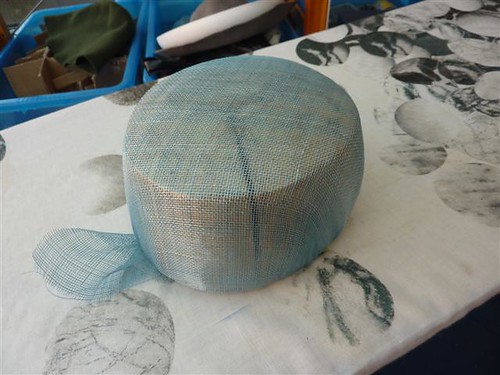
First I steamed my hood (beautiful dark red wool felt this week) and blocked the crown. I used an elastic and pinned the excess to the underside to get it out the way but to keep it stretched. I picked a brim block that fitted around the crown and propped it all in place. I steamed the brim heavily and then stretched it over the brim, pinning the front, back and sides. Using more steam I stretched the felt all around the brim to make sure it was well stretched and straight. The whole thing was excessively fiddly, but not as time-consuming as I’d expected. The brim had a string groove in so I put a figure of eight knot in a piece of elasticated cord (the only thing I could find that wouldn’t snap) to make a sturdy slip-knot and pulled it tight around the groove. I steamed and pulled until I could see that the cord was making a good indentation.

I also steamed the creases out of the hat I manipulated last week. When I took it off the block though, it is far far too tall! I think I’ll measure how tall I want the crown and cut it to make it a two-piece to bring the height down. I trimmed the brim (I’m really pleased with the manipulation I did on that last week) and decided that I’ll try a rolled edge on that when I wire it.

I was exhausted from a lack of sleep over the weekend so I decided I’d achieved enough and headed home early. I’ll try to get some more work in over the weekend ready for next week. I was disappointed to find out that the last class in December has been moved to early January – when I’ll be away. That means I’ll miss two classes instead of one :o(

Thursday 19 November 2009

Making an emergency 50s hat

Talking to my friend at work yesterday (the one who picked out the fantastic colours for my sinamay headpiece at college) she said she'd been invited to a fancy dress party and didn't know what to wear. And the party is TONIGHT!!! She'd decided on 50s with a pencil skirt and fitted top, but she was worried it wouldn't look like she'd made an effort.

Well, there's only one answer to that - any 50s outfit is topped off with a hat. So I offered to "knock her up" a little pillbox hat.

First question, what have I got enough of in my sewing room? The outfit is black and dark red. I have a red hood, but it's not been stiffened, and I'm not sure I can manage a felt hat in an evening...all my sinamay's the wrong colour...I could knock something together with buckram and cover it...the only black I have is polyester lining fabric - that won't stretch nicely, but I could go for this sort of style (this is a beautiful example from an etsy seller):

I decided it "must" be possible to block buckram, but seeing as it's SO stiff I'd soak it in water first. Ended up with completely floppy buckram and a bowl of black water - hmmm maybe that's not the best way forwards...still, it blocked fairly easily (it doesn't have the open weave of sinamay so I didn't manage to get all the lumps and bumps out, but that's no problem as the pillbox would be less than half the height of the block and I had it pretty smooth down to there.

An hour later, after making a delicious roasted veg lasagne recipe here the buckram was still dripping wet (and dripping black all over my kitchen floor!) Out came the hair dryer and I discovered that if you use that on coloured drawing pins, the plastic covers fall off and your kitchen ends up looking like you've had a smartie-masacre!!!

But after all that, a beautiful pillbox shape. It twisted slightly (I guess that's because I only used one layer) so I wired the brim and that pulled into shape nicely.
I then traced the top of the block onto the black lining, added a seam allowance, cut a strip a little longer than the distance round the block and made a tube with the oval sewn to the top. I stitched the top into place so it stretched out, then ran several rows of running stitch down the tube.

When the running stitch was all done, I gathered the fabric and sewed it into place over the wire. It's not great, but it's pretty good for just a few hours' work in the evening (and on the train this morning) - I hope she likes it

Update: She loved it and here she is looking fabulous wearing it:

Tuesday 17 November 2009

2nd Millinery Course - Week 9

This week we started to have our individual tutorials. I printed off all my diary posts and added in some of the pictures of my research (not nearly enough it seems) along with the other bits I’ve done – spider diagrams, word association, analysis of individual pictures. Then I stuck it all in a folder, loaded up myself with bags of hats (I genuinely hadn’t realised how much I’d produced on the course so far) and proceeded to almost get it all to Fulham Broadway in one piece (a very nasty man tried to squeeze past me, squashed everything and then yelled at me)

I’d brought a hood with me to try some manipulation. First I blocked it on a rounded dome block, pulling it right down to the bottom. Then I released it, lifted it up a little and introduced a fold around the crown. I was going to do more, but I loved the simplicity of it so I pinned that in place and got to work on the brim.

I steamed the brim heavily then started to play with it to try all sorts of shapes. Eventually I settled on having it up on one side and down on the other, with an additional flick down at the top to keep it the right height. I steamed and stretched and compressed all over the place to make it look right and left it in the oven to dry. When it came out it looked like I hadn’t done all the steaming and stretching though – it was wrinkled up again!!!

While I was doing all that, I made up some bias binding in sinamay and started to bind the edge of my headpiece. I was surprised how easily the sinamay was worked around quite tight curves and how smart it looks as it's done.

I had my tutorial right at the end of the evening. The teacher seemed to like my folder, but expected far more photos and pictures and didn’t really look at the rest of the stuff I’d done. I guess I’m taking the wrong approach with my research, but the last time I did a project like this was at school so I know I’m a bit rusty. Oh well, I’ll try to go in a slightly different direction with it from now on.

PHOTOS TO FOLLOW - I'VE BROKEN MY COMPUTER AT HOME SO I'M GETTING A BIT BEHIND WITH THEM

Friday 13 November 2009

Pinstripe Baker Boy Hat

Someone at work provided me with some beautiful and incredibly luxurious woolen pinstripe in dark grey and lime green. She asked if I could make her a hat out of it, provided me with a sketch of what she was thinking and handed it over.

I made up a simple baker boy that I've made for myself a couple of times. I worked hard to get the pinstripes lining up and I love the effect that made. The head fitting band was a pain as I did it on the bias, causing it to stretch slightly. This caused the front to ruck up when I put it together, but I steam ironed it until it came back into shape.

Well, here's some pictures:


Wednesday 11 November 2009

2nd Millinery Course - Week 8

So, we’re on the sinamay headpiece. I arrived and went straight for my work (wrapped up in a plastic bag to stop it fading) – it’s even more beautiful than I remember and I just LOVE the way it looks different colours in different directions. I had no idea when I decided to block more than one colour that it would look this good!

Anyway, enough of that. First we stiffened it by painting over it with a thin coating of PVA glue mixed with water (1/4 PVA and 3/4 water) and putting it back in the oven to dry. Another hat dripped on mine so when I took it out there was a big white splodge on it. I ironed it and the white splodge melted into nothing. Phew!

While we were waiting for them to dry, we made some bias binding and stretched it using the iron. A couple of us had sinamay that stretched massively, leaving us with very long very thin binding that couldn’t really be used for anything – a good lesson in testing before you do the real thing! I did manage to turn it into a very funky spring shape with the iron though, which looks fantastic. It sorts out the edges as well, which fray very easily. I might try using that technique on my hat!

The hats were now dry and we used pins to mark out the shapes we wanted to cut from them. There’s such a variety from classic kidney and tear drop shapes to punctuation marks. I love the v-shape that’s created when the sinamay is stretched when it’s blocked so I based my design on that.

With the design marked, we removed the sinamay from the block (still attached to the cling film) and cut it out. This was really scary – it’s very difficult to properly visualise the shape you’re cutting and you’re sort of trusting to faith. We bent wire into the same shape as we’d cut and stitched it to the edge – tie tacks first, then blanket stitch.

And that was as far as we got. I need to get my research and my diary printed out this week so that it can be put in my folder ready for a tutorial next week to review my progress. I’m strangely excited by that!

Thursday 5 November 2009

Inspiration

I went to see Phantom of the Opera last night and the costumes were amazing. Yes, yes I know I'm supposed to just sit back and enjoy the show, but I couldn't take my eyes off the colours and the shapes. Plus the HATS!!! They were everywhere and gave me so many fantastic ideas. I came straight out and filled a few pages of my ideas book.

When I grow up I want to be a theatrical milliner!!!

Wednesday 4 November 2009

Project 16 - Purple Coat - Update

Well, I wore it to work today - with a belt as it doesn't have buttons yet, but what's the harm in that!!!

I finally worked out, after spending all last night swearing at snapped threads, that if I put the sparkly thread in the bobbin it works beautifully!!! I'd had enough by then though and decided to put it away for the night before I did something stupid.

So, what have I done? I finished off the skirt (the instruction that was completely incomprehensible on Sunday night worked really well with a little playing last night - I just pinned it and played with it until it looked right).

Then I stitched the skirt to the bodice. Again I didn't really understand the instructions so I stitched it to the outside (wool) and then hand stitched the lining onto it, which gave a beautiful finish (and an opportunity to get more hand stitching practice whilst watching a fascinating programme on black holes). I think that's roughly what the instructions said, but I get the impression that whoever was writing them was getting a bit bored of doing it towards the end!!! I'm going to unpick the sleeve linings and do them the same way as it looks really smart.

Then the last thing I did was the top stitching - and a lot of swearing. It was only in testing the button holes on scraps that I tried putting the sparkly thread in the bobbin and it came out PERFECTLY and didn't snap!!! Wish I'd worked that one out earlier, but every experience is a learning experience.

I took a few photos of the bodice last night and will get some photos of the whole thing tonight and put them all up soon.

I'm so unbelieveably proud that I've made a real life coat!!! I'm so proud of how professional it looks - the pleats especially - and the fit of the coat is gorgeous.

Tuesday 3 November 2009

2nd Millinery Course - Week 7

Right, so after a break for half-term (I spent my Monday night in the audience for “I’m Sorry I Haven’t A Clue”) it’s back to work this week.

I started the evening with my standard rush to Milliner Warehouse on the way to the course. I picked out two colours of sinamay – royal blue and gorgeous green. I’d been chatting with a friend at work about what colours to do and she’d suggested taking inspiration from a peacock feather – so I did. The two colours look fantastic together.

After a bit of an introduction to sinamay, we started to block a crown shape. It’s totally different to working with straw or felt, mainly as you’re blocking a flat piece of fabric into a head shape, rather than starting with a hood. The technique is completely different too. I’m going to try to explain it without the benefit of photos as I forgot my camera (fool!!!), although I did take a photo of the finished product with a friend’s - oooh I've now blocked another one at home and put the pictures up to explain it.

Right, so first you cut a square of the sinamay, slightly bigger than the block. You place it on the bias, so the corners are pointing to the front, back and sides of the block, pinning the four corners in place. Next you dampen it slightly, just spray a little water on your hands and rub it on the fabric, no more than that, and start to stretch it at the corners. This pulls the threads of the fabric from a right angle to a sharp “V” and as if by magic the fabric between the pins starts to pull tight.

Now don’t get me wrong – it’s NOT that easy! It took everyone a while to get used to it and there was a lot of grunting, growling and swearing in the room. The sinamay’s pre-stiffened and the chemicals dry out your hands massively and the sharp ends of the fibres take a lot of the top layer of skin off – lovely stuff! But eventually you’ve got a head shape fairly smoothly. Great sense of achievement! Plus the amusement that every time you rub water onto the fabric it feels like you’re rubbing a bald head!!!

So, you iron the bald head to fuse the fibres together in their new funky positions, stand back and admire your handiwork. Not bad, but it looks a bit thin to be honest. Aha, that’s because you need 3 LAYERS of the stuff!!! Layer 2 is put on at 45degrees to the original and because of the way you’re now stretching across the straighter bits of the block seems to go on a lot easier. Iron that one and it sticks to the first layer – that’s the business. Then onto the third layer at the same angle as the first. Now we’re talking – this is still hard work, but it’s going much easier as you learn how the fibres move and work together.

I’d done mine with the blue on the first and third layers with the green in the middle and it looks fantastic. I’m so pleased with it. I popped it in the oven for half an hour and got a well-deserved cup of tea.

The rest of the session was spent on playing with manipulating the sinamay. We damped it slightly, put a little PVA glue on (to stiffen it as it dries) and rolled the edges of bias-cut sinamay. I made some bias binding (it’s so easy to manipulate – I did some pretty permanent-feeling folds by hand) and people had a play with making leaves and flowers and all sorts with what they had left over. So next week we’ll be stiffening the crowns and cutting them out into pretty shapes before decorating them.

Monday 2 November 2009

Project 16 - Purple Coat

Ok, so my first coat – and I picked up McCall 5513 over the summer in one of the $3 sales (BARGAIN!) I’ve got a few smart coats and an old battered leather jacket, but I really like the current styles and this one is my favourite.

I’d already decided not to do the appliqué on the back – it’s just not my style and to do some funky contrasting stitching on the seams. I picked up some fairly cheap purple wool coating (a GORGEOUS) colour along with some red lining from Fabric Land. I was going to face it in either lighter purple or red, but when I unpacked the purple I realised I’d been sold 150cm wide when I was told it was 115cm wide so I had loads too much so I decided to self-face. I also bought a set of massive red shell buttons (costing almost as much as the fabric).

I got it all cut out this week, then after spending most of Saturday re-arranging and cleaning my sewing room I got started on Sunday morning. The bodice went together like a dream. All the easing of the shoulder seams and sleeves slipped into place so easily. I officially love working with wool!!! I did all the topstitching in sparkly red thread which is very exciting (although it does snap at the most inopportune moments). I didn’t change anything really except to topstitch most of the seams (only a select few are stitched in the design and that looked a bit random to me) and to machine the lining onto the shoulder seam rather than hem it and slipstitch it. I’m going to get some red binding for that seam to smarten it up, but it feels fine.

Dark fell (so early – since when has it become NOVEMBER?) and after dinner I got onto the skirt. Now that’s more complicated. First are the dozen or so pleats, the only section so far where the instructions are really lacking. All it says is pleat as shown in the picture. I’d never done pleats before, but with a little help from a book I got them sorted and looking rather smart.

The bottom has to be gathered to about ¼ of its original size which with the wool fabric is hard work. The instructions say to run two lines of stitching along the bottom and use those to gather, but my thread just kept snapping. I ended up unpicking that and, following a review I’d read on patternreview.com I found some thick elastic, cut it to the right size and sewed it on stretched out. Even then I had to manually “squidge” the wool as it went through the machine as it was longer than the full stretch of the elastic!!! Eventually (I must have been working on that seam for 2-3 hours – the first difficult part of the coat) I got it done and stitched to the lining and headed off exhausted to bed. I was really disappointed I couldn’t finish it yesterday (I wanted to wear it today), but I’ll do my best to get it done on Tuesday night. It looks like there’ll be a bit more gathering at the top of the skirt but I’m on instruction 54 of 63 so I’m almost there...
 
/* GOOGLE ANALYTICS - tracking code */