Showing posts with label sinamay. Show all posts

Wednesday, 2 February 2011

Photo Shoot and Etsy Listing

I've put the sinamay headpiece I love up on Etsy - it's inspired me to make so many more and I'm running out of space for boxes under my bed!

It's listed here: http://www.etsy.com/listing/67295613/sculpted-sinamay-headpiece

And here's the photos Rich helped me take (isn't he brilliant)


Tuesday, 26 October 2010

More exciting new stuff

I'm very sorry for being so bad at coming and showing you all what's going on, but I'll make up for it by posting some photos at the weekend.

I've been taking the 'Millinery Trimmings & Fascinators' course at London College of Fashion and all my blogging time has been taken up by homework for this!

Our tutor is Thomas Von Nordheim and his teaching style really suits me. We're doing a sinamay and a covered buckram headpiece over the seven week course and although the first few lessons covered stuff I've done before, Thomas is fantastically approachable and really helpful, especially on a personal level.

I wanted to do the course because I feel that where my hats are now of a great standard and beautiful shapes, I really struggle with how to finish them. I see all these hats covered in feathers and 'frou frou' and feel like I should do the same. Thomas has listened to my style and my ideas and helped me to understand how I can do trimmings my own way. He's helped me to develop an amazing sinamay headpiece which I finished tonight. It's got a feather, but just one statement one and it's fantastic (can you tell I'm in love). This course has been so much more than I dreamed it could be and I really feel like I've found the next step in my hat making now.

Sunday, 4 July 2010

Making a mini boater - tutorial part 2

Right now ladies and gentlemen, where were we? I believe we'd just blocked the sinamay crown and brim.

First take your sinamay off the block. The easiest way to do this is to cut the cling film and remove it on this, then remove the cling film from the hat. Cut the shape of the brim using the shape you originally identified (I used this plate) and cut the crown by measuring down a constant amount (mine's 2 inches)


Now put your crown onto your brim, with the crown on the outside if that's possible (it's difficult as you've used the same size block for both but stick with it). Try to line up the grain of the sinamay on the crown and the brim. Stitch the two together using a double thread. It goes against what you'd expect, but have the thread showing on the outside of the hat.


If you want to wire the brim, first stitch a bias strip of tarlatan to the edge (or a very small very thin bias strip that's smaller than the trimming you're going to use. Stitch the wire to this. It prevents too much hassle with the sinamay unravelling). I didn't wire this brim as it's so tiny it doesn't really need it. Then stitch your trimming (I've used matching navy cotton bias binding) to the edge of the brim.

(Oh dear, I didn't take a picture of that stage. You'll have to look at a later picture to see that).

Now we're onto trimmings. You can do whatever you want here, but I've made three leaves out of the same sinamay by cutting a leaf shape and rolling the edges. I've made another rose with the fantastic tutorial from Prudence Millinery to go with it. Finally, a bias strip of the same fabric as the flower has been used as a hat band. I've not pressed it too hard so that it sticks up and gives a bit of extra shape to the hat.


Finally we need to attach it to the head. For this hat, elastic would work, but I prefer a hairband. I make mine by bending millinery wire to the shape of my head. Normally I'd make a very small one to be attached with hair grips. I made it a bit bigger this time like a normal hair band but I'm not as keen on that actually.


Now stitch the hat secrurely onto the hairband. This always feels like it's going wrong until all four contach points are stitched and suddenly it's very secure and very comfortable.


All done...it takes a while, but it's so worth it. I wore it out tonight and it's a gem to wear.

In the last few photos it's sitting on the bag I made my mum for her birthday but it's bedtime now so you'll have to wait until later in the week to find out about that.

Thursday, 1 July 2010

Making a mini boater - tutorial part 1

I've had a few queries about how the mini boater was made (and I desparately want my own) so I've decided to make another one and show you how it's done...

I'm making this one with some sinamay I've been dying to use for ages rather than silk-covered buckram, but the concept of blocking it is much the same. The silk covering is a bit more complex - maybe I'll do another of those and show you as well - do you want it?

Ok, to begin with you need to think about the shape and size of the hat. I haven't got a mini boater block so I searched around the house for things that would do. The crown of the hat is blocked on a metal wine cooler and I've based the brim around a side-plate. I needed a flat piece of wood to block the brim on so I've used an old drawer. Here's what I based the hat on:


I covered the drawer and the cooler in cling film (just normal food grade stuff) to protect them from the water and to prevent the sinamay sticking to the blocks. I'm blocking both the brim and the crown in one go, but if you've not done much blocking before I'd suggest doing them separately (do the crown first, then when that's dry take it off and do the brim.


Next I cut out 4 pieces of sinamay. This was as I'm using a patterned sinamay - if I was using a normal one I'd cut out 6 pieces and if I were using buckram I'd cut two pieces. I took the size of my hat (remember the plate) and cut them out an inch or so bigger on each side.


Cut a hole in the middle of two pieces about an inch smaller than the crown block.


Now wet the first layer of sinamay (I use that spray bottle you may have noticed) so that it's nice and flexible. Pull it down over the block, making sure some of it still sticks up - you'll be attaching the crown to this later. Repeat with another layer of sinamay. With 'normal' sinamay this should be at 45 degrees to the first layer and a third should be in same direction as the first. To keep the pattern of mine I blocked just two layers in the same direction as one-another. Secure the centre with a hair band or some elastic.


Pin out four poles using millinery pins like these or household pins (you'll need a thimble to get them in the wood, but they work a treat). Stretch the sinamay flat, but remember to keep your shape.


Now use a few more pins to flatten the sinamay out across the wood. This should be nice and easy as you're just flattening it back to its original shape.


Now that that's done, onto the crown. You'll need the rest of the sinamay. Again get it nice and wet, then drape it over the top of your 'block'. Use another elastic or hair band to hold it in place as low down as you can without missing bits. If you're using three layers of 'normal' sinamay, the middle one should be at 45 degrees to the others.


Now gently ease the folds of sinamay. If you pull it on the bias, it will stretch that way allowing you to form it into the shape of the block. This also gives beautiful patterns which are great fun to play with - go on, have a go.


Now it's time to pour a glass of wine, pop on Film Four and watch the end of The Day After Tomorrow (oh no apparently not - my husband's come down and switched it over to Mock The Week based on the fact we've got The Day After Tomorrow on DVD...he may have a point.

I'll be back at the weekend with part 2.

Saturday, 26 December 2009

Merry Christmas! & a Christmas Day Project

I hope everyone had a fantastic Christmas and feels as relaxed and contented as I do.

I had a wonderful day and got loads of hat books. The best one was Fashion Hats - Design & Make by Karen Henriksen - lots of fantastic ideas, tips and techniques and all really nicely laid out. Good for someone my level who knows the background and has confidence making the hats, but hasn't done much trimming yet.

Like any child on Christmas day, I put all my lovely presents aside and played with something else - some sinamay and feathers for a hat for my mum for a wedding in January. I blocked it on Christmas eve and got the piece wired yesterday. I was playing around with sinamay and made a fairly classic looking fascinator, which I attached to a comb. It was fiddly, but went together in just a few hours.

First I made a bias strip about the width of a DVD (what can I say, I used what I had to hand) and as long as the fabric could handle. Then I used and iron to stretch it and while it was warm I formed it into soft curls. I worked the curls into a ball shape and stitched it in position. I took several of the long feathers and laid them out in a circle. I used a piece of cotton to wrap around them where they met to make a fan shape out of them and then stitched this to the back of the sinamay ball. I then stitched the black feathers into the middle individually. Finally I attached the whole thing to a hair clip and popped it on my mum. I'm rather pleased with how it turned out.

Tuesday, 8 December 2009

2nd Millinery Course - Week 12

I’ve been thinking more and more about my design and I think that, although I love the look of felt and love working with felt, it just doesn’t have the ‘occasion’ of sinamay. Plus I’m less confident working with sinamay and want to get more practice with it. So I decided that my challenge for last night was to block a two-piece in sinamay.

The problem is that I just don’t like the look of your classic sinamay hat, all mother of the bride and weddings and not what I’m aiming for. I had a wander round John Lewis and Milliner Warehouse for inspiration and decided to make a hat with a felt crown (so I can have another play at manipulation) and a sinamay brim, teaching me how to block that and attach it. To decorate, I’ll add a large flower motif in felt with sinamay swirls and wotnots to bring the two materials together. If it all works out well I’ll wear it to a wedding in January. To bring it in line with the dress, I’ll do decorative topstitching on all the decorative bits in the same colour thread as my dress.

I picked up a fur felt in chocolate brown and some matching sinamay and was ready to go. Brown’s not really my thing, but I wanted to try manipulating with a fur felt and it was chocolate, pale brown or black. I figured the chocolate will go best with my dress.

First I blocked the brim. I chose and off-centre brim block, not too big, and found out very quickly that blocking a brim in sinamay is a LOT easier than blocking a crown!!! I guess that’s not much of a surprise really as the brim is pretty flat and the crown’s all curved and the sinamay’s flat, but I didn’t expect it to be that much easier. Although I did break my elastic doing it!!! I stiffened it with PVA and popped it in the oven to dry.

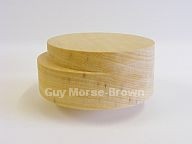
I’d had an idea of a block with a fairly blocky top, kind of like this one from Morse Brown, but there was nothing like that in the cupboard so I decided to manipulate some folds into a dome shaped crown block. To fit the big floral thingy on the side I decided to just manipulate on one side. I have no idea what this is going to look like, but it’ll be exciting to find out.

I steamed the hood and blocked it on a tall dome shaped crown. Then I put the centre crease in, the two next to it and then started to work down one side. I didn’t like how the front looked so I brought the creases down to form ‘v’s at the front. It’s a lot easier to manipulate the fur than the wool felt and the finished article is a lot more dramatic. I was really pleased with how it came out.

I popped that in the oven and removed the sinamay brim. It’s the last week of term and I’ll miss the first two weeks of next term because I’ll be in India so I have rushed everything off the blocks a lot quicker than I normally would. I hope that won’t affect the finished product too much. I tacked the line on the block that shows the head fitting, but there’s not much else I can do with that until it’s wired. I have found out that I need to cut out the head fitting about an inch in, put in darts and fold up the excess, then stitch it to the crown like that. I’m very nervous about doing that on my own the first time, but I’m sure it’ll be ok.

So finally I removed the crown from the block and wobbled home overladen with precious very delicate things and getting far too much interest from random people on the tube. I hope to get this finished over the Christmas period – maybe I’ll devote next Monday night to it...

Tuesday, 17 November 2009

2nd Millinery Course - Week 9

This week we started to have our individual tutorials. I printed off all my diary posts and added in some of the pictures of my research (not nearly enough it seems) along with the other bits I’ve done – spider diagrams, word association, analysis of individual pictures. Then I stuck it all in a folder, loaded up myself with bags of hats (I genuinely hadn’t realised how much I’d produced on the course so far) and proceeded to almost get it all to Fulham Broadway in one piece (a very nasty man tried to squeeze past me, squashed everything and then yelled at me)

I’d brought a hood with me to try some manipulation. First I blocked it on a rounded dome block, pulling it right down to the bottom. Then I released it, lifted it up a little and introduced a fold around the crown. I was going to do more, but I loved the simplicity of it so I pinned that in place and got to work on the brim.

I steamed the brim heavily then started to play with it to try all sorts of shapes. Eventually I settled on having it up on one side and down on the other, with an additional flick down at the top to keep it the right height. I steamed and stretched and compressed all over the place to make it look right and left it in the oven to dry. When it came out it looked like I hadn’t done all the steaming and stretching though – it was wrinkled up again!!!

While I was doing all that, I made up some bias binding in sinamay and started to bind the edge of my headpiece. I was surprised how easily the sinamay was worked around quite tight curves and how smart it looks as it's done.

I had my tutorial right at the end of the evening. The teacher seemed to like my folder, but expected far more photos and pictures and didn’t really look at the rest of the stuff I’d done. I guess I’m taking the wrong approach with my research, but the last time I did a project like this was at school so I know I’m a bit rusty. Oh well, I’ll try to go in a slightly different direction with it from now on.

PHOTOS TO FOLLOW - I'VE BROKEN MY COMPUTER AT HOME SO I'M GETTING A BIT BEHIND WITH THEM

Wednesday, 11 November 2009

2nd Millinery Course - Week 8

So, we’re on the sinamay headpiece. I arrived and went straight for my work (wrapped up in a plastic bag to stop it fading) – it’s even more beautiful than I remember and I just LOVE the way it looks different colours in different directions. I had no idea when I decided to block more than one colour that it would look this good!

Anyway, enough of that. First we stiffened it by painting over it with a thin coating of PVA glue mixed with water (1/4 PVA and 3/4 water) and putting it back in the oven to dry. Another hat dripped on mine so when I took it out there was a big white splodge on it. I ironed it and the white splodge melted into nothing. Phew!

While we were waiting for them to dry, we made some bias binding and stretched it using the iron. A couple of us had sinamay that stretched massively, leaving us with very long very thin binding that couldn’t really be used for anything – a good lesson in testing before you do the real thing! I did manage to turn it into a very funky spring shape with the iron though, which looks fantastic. It sorts out the edges as well, which fray very easily. I might try using that technique on my hat!

The hats were now dry and we used pins to mark out the shapes we wanted to cut from them. There’s such a variety from classic kidney and tear drop shapes to punctuation marks. I love the v-shape that’s created when the sinamay is stretched when it’s blocked so I based my design on that.

With the design marked, we removed the sinamay from the block (still attached to the cling film) and cut it out. This was really scary – it’s very difficult to properly visualise the shape you’re cutting and you’re sort of trusting to faith. We bent wire into the same shape as we’d cut and stitched it to the edge – tie tacks first, then blanket stitch.

And that was as far as we got. I need to get my research and my diary printed out this week so that it can be put in my folder ready for a tutorial next week to review my progress. I’m strangely excited by that!

Tuesday, 3 November 2009

2nd Millinery Course - Week 7

Right, so after a break for half-term (I spent my Monday night in the audience for “I’m Sorry I Haven’t A Clue”) it’s back to work this week.

I started the evening with my standard rush to Milliner Warehouse on the way to the course. I picked out two colours of sinamay – royal blue and gorgeous green. I’d been chatting with a friend at work about what colours to do and she’d suggested taking inspiration from a peacock feather – so I did. The two colours look fantastic together.

After a bit of an introduction to sinamay, we started to block a crown shape. It’s totally different to working with straw or felt, mainly as you’re blocking a flat piece of fabric into a head shape, rather than starting with a hood. The technique is completely different too. I’m going to try to explain it without the benefit of photos as I forgot my camera (fool!!!), although I did take a photo of the finished product with a friend’s - oooh I've now blocked another one at home and put the pictures up to explain it.

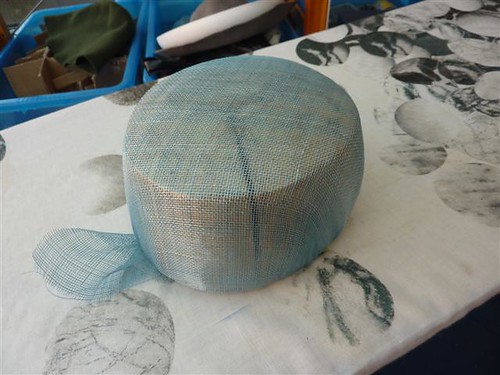
Right, so first you cut a square of the sinamay, slightly bigger than the block. You place it on the bias, so the corners are pointing to the front, back and sides of the block, pinning the four corners in place. Next you dampen it slightly, just spray a little water on your hands and rub it on the fabric, no more than that, and start to stretch it at the corners. This pulls the threads of the fabric from a right angle to a sharp “V” and as if by magic the fabric between the pins starts to pull tight.

Now don’t get me wrong – it’s NOT that easy! It took everyone a while to get used to it and there was a lot of grunting, growling and swearing in the room. The sinamay’s pre-stiffened and the chemicals dry out your hands massively and the sharp ends of the fibres take a lot of the top layer of skin off – lovely stuff! But eventually you’ve got a head shape fairly smoothly. Great sense of achievement! Plus the amusement that every time you rub water onto the fabric it feels like you’re rubbing a bald head!!!

So, you iron the bald head to fuse the fibres together in their new funky positions, stand back and admire your handiwork. Not bad, but it looks a bit thin to be honest. Aha, that’s because you need 3 LAYERS of the stuff!!! Layer 2 is put on at 45degrees to the original and because of the way you’re now stretching across the straighter bits of the block seems to go on a lot easier. Iron that one and it sticks to the first layer – that’s the business. Then onto the third layer at the same angle as the first. Now we’re talking – this is still hard work, but it’s going much easier as you learn how the fibres move and work together.

I’d done mine with the blue on the first and third layers with the green in the middle and it looks fantastic. I’m so pleased with it. I popped it in the oven for half an hour and got a well-deserved cup of tea.

The rest of the session was spent on playing with manipulating the sinamay. We damped it slightly, put a little PVA glue on (to stiffen it as it dries) and rolled the edges of bias-cut sinamay. I made some bias binding (it’s so easy to manipulate – I did some pretty permanent-feeling folds by hand) and people had a play with making leaves and flowers and all sorts with what they had left over. So next week we’ll be stiffening the crowns and cutting them out into pretty shapes before decorating them.
 
/* GOOGLE ANALYTICS - tracking code */