Showing posts with label buckram. Show all posts
Sunday, 12 June 2011
Lily
I had a dream of a jewel encrusted flower head-dress. Jumping out of bed the next morning I searched for a while for the flower I'd dreamed of. It was a lily.
When I had a think about it, I didn't want to cover the whole thing in sparkles - because this beautiful, simple flower should be BIG. But look at those lovely spots on it, those should be picked out in tiny gem stones.
I love silk flowers, but sometimes I want to play with different fabrics. I found myself drawn to some canvas. I felt that the texture of it was similar to how I'd expect the flower to feel. It looks sturdier than silk. I also liked the idea of the flower being a luxury item made out of a more traditional fabric.
As canvas won't hold a shape all that well, I made the petals out of buckram and wired them to give them structure and those fantastic curves.
The stamen are made from wire wrapped in tulle. Here they are in progress (the one on the left is completed, the other two need to be finished:
Now to the petals. I love the colour in the pink one above, but wanted to make it in blue. I painted the individual petals to make them darker in the middle and lighter towards the edges. I'm really happy with the result.
Now it was just a matter of assembling the whole thing, following the shapes of the petals I'd made. This was fiddly but the canvas was giving just the effect I was after. I added the gemstones at this point to.
Now to assemble the petals and the stamens to make the flower.
Being canvas, this is quite heavy for a headpiece so would need some pretty hardcore way of fixing it to the head. I opted for a hand made headband combined with a comb. Here's the headband, made to keep the flower secure:
It looks a bit weird, but the shape on there holds the stem of the flower firm so it can't rotate. Here's the finished piece and a lovely close-up.
I'll get some better photos later, I'm just so excited I needed to share this. It's surprisingly comfy to wear and feels really glamorous. I wish I were going to Ascot!
Monday, 16 May 2011
Minnie
This is Minnie. She reminds me of a grown up Minnie Mouse. I'd love to wear her with a red and white polka dot skirt.

Minnie is a bow formed on a millinery buckram base and covered in sequins. She's covered in deep black velvet on the other side to give extra depth.

The bow is reflected in a shaped headband, which is sculpted to the head and velvet covered for comfort and grip.
This method of holding hats on is unbelievably comfortable and secure. A comb is added for those windy days.
The bow sits cheekily off-centre and is a guaranteed conversation starter. When I show pictures of this hat, it makes everyone think of something and brings a smile to everyone's face.
This hat would be perfect for the races or a really special party. The black would look equally fantastic with a sexy black dress or a bright coloured one. I'd love to see what you would partner it with.
Thursday, 19 November 2009
Making an emergency 50s hat
Talking to my friend at work yesterday (the one who picked out the fantastic colours for my sinamay headpiece at college) she said she'd been invited to a fancy dress party and didn't know what to wear. And the party is TONIGHT!!! She'd decided on 50s with a pencil skirt and fitted top, but she was worried it wouldn't look like she'd made an effort.
Well, there's only one answer to that - any 50s outfit is topped off with a hat. So I offered to "knock her up" a little pillbox hat.
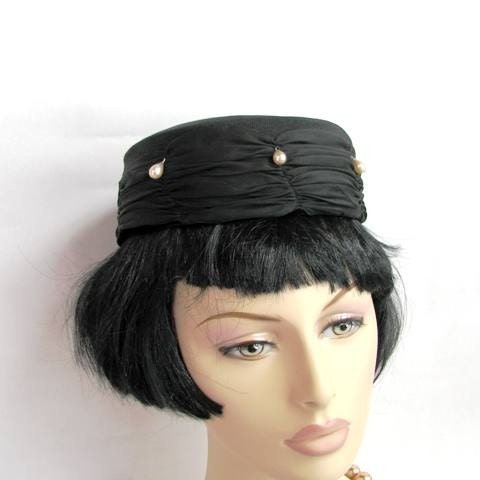
First question, what have I got enough of in my sewing room? The outfit is black and dark red. I have a red hood, but it's not been stiffened, and I'm not sure I can manage a felt hat in an evening...all my sinamay's the wrong colour...I could knock something together with buckram and cover it...the only black I have is polyester lining fabric - that won't stretch nicely, but I could go for this sort of style (this is a beautiful example from an etsy seller):
I decided it "must" be possible to block buckram, but seeing as it's SO stiff I'd soak it in water first. Ended up with completely floppy buckram and a bowl of black water - hmmm maybe that's not the best way forwards...still, it blocked fairly easily (it doesn't have the open weave of sinamay so I didn't manage to get all the lumps and bumps out, but that's no problem as the pillbox would be less than half the height of the block and I had it pretty smooth down to there.
An hour later, after making a delicious roasted veg lasagne recipe here the buckram was still dripping wet (and dripping black all over my kitchen floor!) Out came the hair dryer and I discovered that if you use that on coloured drawing pins, the plastic covers fall off and your kitchen ends up looking like you've had a smartie-masacre!!!
But after all that, a beautiful pillbox shape. It twisted slightly (I guess that's because I only used one layer) so I wired the brim and that pulled into shape nicely.
I then traced the top of the block onto the black lining, added a seam allowance, cut a strip a little longer than the distance round the block and made a tube with the oval sewn to the top. I stitched the top into place so it stretched out, then ran several rows of running stitch down the tube.
When the running stitch was all done, I gathered the fabric and sewed it into place over the wire. It's not great, but it's pretty good for just a few hours' work in the evening (and on the train this morning) - I hope she likes it
Update: She loved it and here she is looking fabulous wearing it:
Well, there's only one answer to that - any 50s outfit is topped off with a hat. So I offered to "knock her up" a little pillbox hat.
First question, what have I got enough of in my sewing room? The outfit is black and dark red. I have a red hood, but it's not been stiffened, and I'm not sure I can manage a felt hat in an evening...all my sinamay's the wrong colour...I could knock something together with buckram and cover it...the only black I have is polyester lining fabric - that won't stretch nicely, but I could go for this sort of style (this is a beautiful example from an etsy seller):
I decided it "must" be possible to block buckram, but seeing as it's SO stiff I'd soak it in water first. Ended up with completely floppy buckram and a bowl of black water - hmmm maybe that's not the best way forwards...still, it blocked fairly easily (it doesn't have the open weave of sinamay so I didn't manage to get all the lumps and bumps out, but that's no problem as the pillbox would be less than half the height of the block and I had it pretty smooth down to there.An hour later, after making a delicious roasted veg lasagne recipe here the buckram was still dripping wet (and dripping black all over my kitchen floor!) Out came the hair dryer and I discovered that if you use that on coloured drawing pins, the plastic covers fall off and your kitchen ends up looking like you've had a smartie-masacre!!!
But after all that, a beautiful pillbox shape. It twisted slightly (I guess that's because I only used one layer) so I wired the brim and that pulled into shape nicely.
I then traced the top of the block onto the black lining, added a seam allowance, cut a strip a little longer than the distance round the block and made a tube with the oval sewn to the top. I stitched the top into place so it stretched out, then ran several rows of running stitch down the tube.
When the running stitch was all done, I gathered the fabric and sewed it into place over the wire. It's not great, but it's pretty good for just a few hours' work in the evening (and on the train this morning) - I hope she likes it
Update: She loved it and here she is looking fabulous wearing it:
Subscribe to:
Posts (Atom)