oh my oh my oh my - some very very lovely person has sent me some marfy patterns to try before I get started on the "marfy challenge" and I've just had a little play with this dress (third image):
http://www.marfy.it/eng/activenews.asp?idcat=3453&idart=54101&azione=list&layout=
I picked it as it was the only dress and as you may have noticed, I have a teeny bit of a thing about dresses...
well I made it up (incredibly easily - I was surprised - it only took about an hour!!!) just to see how it went in scrap fabric and it's the most beautiful thing I've ever put on!
so little bit of a change in plan - looks like this is what I'm making up in the silk...it's mind blowing and with the drape of the silk it's going to be divine.
Going to rip apart this toile and maybe cut the silk today I'm so excited!!!
Sunday, 26 July 2009
Wednesday, 15 July 2009
Project 14 - Silk - Update
I made up the bodice again last night but I'm still not happy with it. Tried doing French seams for the first time because all my research on silk suggested it - a lot easier than I'd expected (even though I felt I was doing things wrong by sewing on the righ side of the fabric) and very useful for lining things up.
Had a go at pinning the seam allowances to check how it looks as I'm not 100% sure about it. I had a second go at expanding it as the 'stretched apart' look of the folds isn't what I was aiming for. Gotta get it right and all...and it's a good learning experience if very frustrating. I'm finding it hard to get my teeth in with only an hour or so an evening available to do work on it.
Oh well it's best to get things right before I start on the silk...
Update: Well, that sort of worked, but I just don't like the shape of the dress now that it's my size. Think I might have a look for a different pattern...
Tuesday, 14 July 2009
Project 14 - Silk - Update
ok, so I finally got around to lengthening the pattern - a good excuse to get my pristine (because it scared me) fitting book out and have a look at what to do.
I had to add 2 inches - there's 2 pleats so I put half an inch above each and an inch below the bottom one. The pattern needed more tweaking than I expected to make the lines match up again, but I think I've done ok.
Hoping to cut that out tonight and redo the toile for the top of it. See if that fits, and if it does I can get on with the real thing (or put it off for another few weeks as I'm scared to cut the silk)
Monday, 6 July 2009
Project 14 - Silk

Well, after years of wandering into Liberty to gaze longingly at the fabric, I finally turned up during the sale and bought myself two metres of this:
I've never held such beautiful fabric and I've certainly never had any clothes made out of something so gorgeous.

As it's the first time I've ever worked with silk, and as it has such a bold pattern I want to make something very simple with it. I have this pattern (used view C for my dress for my Aunt's birthday party) and thought view D would be ideal:
I had to lengthen view C massively (3 or 4 inches in the bodice) when I made it before, and putting the toile together, view D will be the same...BUT...there's no "lengthen or shorten here" line and I'm not entirely sure how to go about it.
Saturday, 6 June 2009
Project 12 - Debbie's Skirt - Update

all finished - I had the fear that it was going to be too small as it looked tiny, but made martha up to her measurements and it looks fine.
Update: Debbie loved it - it's such a treat to be able to give things to my friends and see their smiles
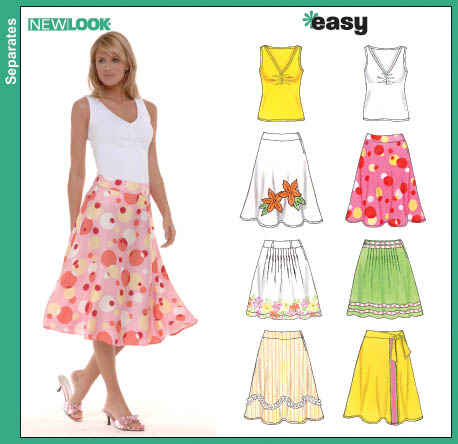
Project 12 - Debbie's Skirt
Well, it's a close friend's birthday this week and we're out tonight so I'm going to make her up this skirt
http://images.patternreview.com/sewing/patterns/newlook/6569/6569.jpg
 Got to the market before the stalls were even set up (I couldn't help it, I was excited) and after a walk in the rain got her these two fabrics
About 1 1/2 hours till we're due to go out, probably have an hour or two when we get home - no problem (fingers crossed)
http://images.patternreview.com/sewing/patterns/newlook/6569/6569.jpg
Got to the market before the stalls were even set up (I couldn't help it, I was excited) and after a walk in the rain got her these two fabricsAbout 1 1/2 hours till we're due to go out, probably have an hour or two when we get home - no problem (fingers crossed)
Monday, 23 March 2009
Millinery Course - Week 9
Right, week 9, the final week of my course
I had no idea how I was going to get everything finished, despite having done everything I possibly could at home. Priority was the swirly wirly hat as I needed to use the block to ensure it kept in shape.
So, I unpinned part of it from the top and sewed the ribbon onto the underside of the top part. Then I sewed the top part to the bit it was overlapping. I worked on both spirals together and unpinned as I went. It was every bit as complicated and fiddly as it sounds, especially with working it while it was partially pinned onto the block. HEre's some photos to make that clearer:
I had run across London and arrived and started early, but that's as far as I got. You'll be pleased to know it's now finished and in use - I'd had to finish off the block and it had got a bit big, but I pulled it in a bit with the ribbon inside which makes up the head fitting and it's a bit loose now, but I wore it on Friday night to go to the Hats exhibition at the V&A with my mum photo hasn't been taken yet, I believe and won't do today as I don't want anyone to see how horrific my hair is right now, but I'll get there...
I didn't even touch the straw hat - bought that home as it was - so there'll still be updates on here as I finish stuff off (OK I finished the basic part of the straw hat yesterday, but I haven't decorated it yet - it's come together even better than the felt one did!
The course ended with a display of all the hats we'd made, so here's a bit of that for you:
I'm actually quite glad I bought stuff home unfinished - this course has filled me with so much excitement day in and day out that I'm glad I've got something to play with. Just wish I could afford my own blocks so I could carry on...
[PHOTO LINKS BEING UPDATED]
Thursday, 12 March 2009
Millinery Course - Week 8
So, the penultimate week has been and gone and I can’t believe it’s almost over!
Where to start? Well, I’d rushed out the door that morning and forgotten my trimmings for my straw hat (you may recognise these when they turn up – a certain cream and black polka dot sinamay which I just happened to buy too much of and produced a fantastic hat with from a fabric pattern last week). I was really cross with myself as I needed that for this week.
So what did I do? I resurrected the swirly hat plan . I got a plain black hood, marked a circle on the top, then a 2” wide spiral all the way down it. I cut along the spiral, then blocked the hat making it overlap slightly. Not as much stretch as the others have had, but it looked really funky on the little cloche block and made me very excited. I’m going to line the edge with white ribbon then stitch it all together Hopefully it’ll keep in shape. And hopefully I’ll be able to complete it in just three short hours!!! Not sure how I’ll do it if I don’t have the block to work with though.
Next, the straw hat – I completed the rolling of the edge. That’s not looking as nice as I’d planned, but it was very fiddly. I’m thinking of using the leftover straw that I cut off to make the decorations – not sure how yet, still working on that bit. One of the other girls in the class has the same straw hood but in white and she gave me her leftover bits so I think that could look very funky. I’m thinking of rolling it around hat wire and having some form of abstract thingy going round the hat. Don’t worry if that doesn’t make sense to you – it doesn’t make sense to me yet!
So, more than 3 hours work there, so I bought home the black and blue hat, which I finished last night! I put a matching blue ribbon around it, gathered it in one spot and fastened with the spare button from the coat it’s designed to match. It looks really professional, although the decoration is a little too far back and obscured by the brim. Still, as always we’re the only ones who see fault in our work. I wore it to work today and I’ve had loads of really positive comments including “it looks like a real hat” from my client!
Since Monday I’ve also been shopping for acres and acres of Petersham ribbon and I made the headband for the embroidered cloche last night (I still have the holes in my fingers to prove it). I’m going to roll the remaining straw around wire in preparation for Monday and I’m going to see how much of the embroidery I can get done. It’s going to be a busy week.
[PHOTO LINKS BEING UPDATED]
Wednesday, 4 March 2009
Millinery Course - Week 7
First things first, starting the fourth hat this far in is too much so I've left that one (for now - I'll be back)
Then onto the black felt hat - I sewed the petersham head band in place and tried the crown on again - it's a fantastic fit.
Next job was to sew the crown onto the brim and all of a sudden everything came together and it suddenly became a hat. All the concerns I'd had about things not fitting - it worked! I can't tell you how good it felt
I wore that hat for the rest of the lesson - you couldn't get me out of it. I didn't want to leave it at the end of the night...next Monday it's decoration time and then it's FINISHED!!!
Right, now onto the straw hat. I hadn't shown you the picture of the brim blocked up so here it is:
So first job was to take it off the block and trim the edges. They were trimmed a couple of cm away from the edge, unlike the felt hat which was trimmed on the very edge line.
Next was to bend the wire into the shape of the brim (a much quicker job this time, but still difficult to perfect) and then to colour it with permanent marker so it wouldn't show through any gaps in the straw
Then it was sewn into the crease you can see in the second picture to give the brim its (fantastic) shape
Finally I started to roll the edge of the brim over the wire to make a clean rolled edge. Didn't get far with that though, so that's my first job next week...
Oh, and the one I bought home - I started to embroider that this weekend - here's the process so far:
[PHOTO LINKS BEING UPDATED]
Tuesday, 24 February 2009
Millinery Course - Week 6
Right, Alion's weekly update part...erm...6 I think...
Arrived tired, grumpy and with shaky hands from the exhaustion of stressful work and not giving myself any down-time. Got my brim out and carried on (very slowly due to the shaky hands) sewing the blue petersham ribbon around it. Quickly relaxed and the troubles of the world (and financial year end with a project with everything going wrong) disappeared away from that little work room with us making our hats. Got the petersham sewed on in fits and spurts throughout the night (to be told by the teacher that it was "pretty much perfect" which made me grow ten feet). Once it's on though, you wipe a damp cloth along it and it shrinks to perfectly mould round the hat - so now it's doubly perfect!!! Sadly no picture as the battery ran out on my camera, but I'll show you some of that complete next week.
Next stage with that hat was to sew some petersham to make a head fitting. I got started (sewed the seam in the back to make it the same size as my head), but no further.
Onto the straw hat. I found a brim (OK I've been coveting it for most the course and it wasn't in use this week) which matches the rakish angle of the crown I chose. Here's the two of them together:
I then totally unpinned the brim, decided that I was happy with the shape even though it hadn't kept as well as I'd wanted (see last week) and chopped off the brim...
Blocking the brim was far easier than the felt one (possibly as the pins went in easier) and with the experience of blocking the straw crown I was really starting to understand how it was working (less of a pull and a stretch, more of an ease and a shape). Sorry no photos here, but it looks grrrrrrrrrrrrrrrrrrrrrreat
Finally, it was time to take the beige cloche off the block. You may remember that I struggled to get it on, to get the hood to stretch around the block, well it was just as hard to get it back off again! The teacher did it for me in the end as I was so worried about stretching it. It did stretch a bit, but apparently we can ease it back into shape. I bought this one home as I'm keen to embroider on it (the felt's a dream to sew on) and my husband got a gorgeous picture of me in it (his photography being key of course - something to do with focussing on the eye so everything else is soft)
And finally, hat number 4. I had this image of a black hat with a spiral down it in white, with the hood cut and resewn to get the shape. Not sure if it'll work, but I've got a hood sitting here at home so I can try it...
[PHOTO LINKS BEING UPDATED]
Thursday, 19 February 2009
Millinery Course - Week 5
 Ok, week 5 was the BEST YET - they're really starting to come together...
First of all, I blocked the pale hood (one of these, forgot to take a picture of it before I blocked it)
I really struggled at first to stretch it enough to get it round the bottom of the block, but kept steaming it and pulling it until it finally stretched. As with the straw hat I had to make a strip to pull it into shape. But boy what a shape!
It's got a rolled edge and the head fitting is actually on the inside so all that stretched felt had to be steamed and fitted to the decreasing size on the inside...to show you, here's how I did it first time:
and here's how I did it after some tutoring and practice:
I'm not really sure how to describe the technique, but you just steam it till it's too hot to handle and pull it into position where you want it. Then you can go back and tidy it up until you're happy with it.
Right, so that one's sitting in the drier and it's on to check how the straw one's coming along. While that's dried, the fantastic "dent" in the top has stretched back out. Didn't do anything with it, but think I'm going to re-block it as it did look far better before. It's all a learning experience...
Unsure at the time what to do with that, and with fingers all crinkled from steam I got down to the brim of my other felt hat. First it had to be trimmed and suddenly it looks like part of a hat
Then it had to be tried on to check the fit. This was a little small, but they've got special equipment (hot sticks on a vice as far as I can tell) for making things bigger and it soon fit just fine
I was really pleased with this as I had been worried how the brim in a size smaller than my head and the crown a size bigger were ever going to fit together.
Next job is to reinforce the brim. Using the block as a guide, we had to bend some wire into the shape of the edge of the brim and then sew it onto the brim itself. At this point, we used the hat bands we'd made in previous weeks to support the hat itself.
And finally (and yes I have noticed that my weekly reports are getting longer) we started to sew the petersham ribbon on over the wire. This was far easier than I expected (and sewing the felt of the hats is just dream-like). The aim is to make the stitching on the ribbon invisible and I really couldnt' see mine. I was so proud!
So the final photos are of that - a prize if you can spot the stitches
Next week we should be sewing the two together. I should be able to block the brim of my straw hat and maybe even decorating the black one (if I can find what I'm looking for)
I just can't wait till Monday!
[PHOTO LINKS BEING UPDATED]
Tuesday, 10 February 2009
Millinery Course - Week 4 Take 2

Well, after a week off (time to be caught up at the end of the course so no worries there) spent wishing I could be there I had another lesson.Seriously, I'm 4 weeks in now - surely I should be SLIGHTLY less excited week by week, but every night all I want is to be there!So, what did we do this week?Firstly I finished my hat band, which is good as the hats get worked on off the blocks next week

Then it was on to the straw hat. You may remember that I stiffened it last time, well I think I used a little too much stiffener and it's rock solid! So I decided that instead of a summery hat I'd make a much more structured smaller hat. I loved this block (oops didn't get a a photo of that) with a "dent" round the top and slightly asymmetrical. Here's how it looks with the top of the hat blocked:

and here when I'd blocked the whole thing:
I'm loving how the colour's looking with the shape. I think I'm going to do an asymmetrical brim.

Next job was the seam in the back of my felt hat. You may remember it looked like this last time:

Well, it got trimmed, stitched and ironed and now it looks like this:

Ready to cut along the brim and work on making that strong.Lastly, I want to make a cloche in a sort of camel colour and embroider it with an autumn leaf (my major inspiration - you should have seen our wedding!) and I've picked out this block, which someone has already used and has come out like this (without any extra work done to it yet to help it keep the shape):

I'm so excited by it all - and it's wonderful to come on here and write all that excitement down. Next step involves wire and ribbon - stay tuned
Monday, 2 February 2009
Millinery Course - Week 4
Hoping the course is on tonight and that I can get there...London seems to be inaccessible by any means this morning!
Update: Nope - snow stops milliners - I miss it already and I wouldn't even be there yet!!!
Update: Nope - snow stops milliners - I miss it already and I wouldn't even be there yet!!!
Thursday, 29 January 2009
Project 8 - Pants - FINISHED

I Have Finally Finished The Pants!
Update: we went away this weekend for the birthday celebrations and he LOVES his new pants! The comments of "wow, you really made those?" are quite possibly the biggest sewing-related boost I've ever had!
AND he says they fit him really well, which is what I was most worried about!
And other than that a fantastic weekend of hiking, kite flying, socialising, games, food and drink - still can't believe we fitted 28 people in that lounge!
Tuesday, 27 January 2009
Millinery Course - Week 3
Well, week three has been and gone and I've blocked the brim of my hat. Last night's lesson was a lot harder than the previous ones and I've got some concerns, but I can see where it's all going now.
Firstly, I bought a straw hood this week in red and some petersham ribbon for the felt hat. I've got the ribbon in black for the inside (to stop the hat stretching) and royal blue for the edge of the brim to go with this coat: http://www.karenmillen.com/pws/images/catalogue/product/011CG00806/mann_medium/011CG00806.jpg
I knew exactly which block I wanted, but someone else got there first so I had to have a rethink. I ended up with this one (which I might like even better...)
 He'd said that we could have a bit of variation in the size block we used when compared to our head sizes. I'm a 22" head and used a 22.5" block for the brim and am now using a 21" block for the brim - it adds up to quite a difference. I've had to put a seam in the back of my brim because of it (to take out the extra felt) but really can't see how it's all going to go together with such a massive difference...
 First job was to mark the cutting line on the crown and remove the brim. Very scary to make that first cut...
Blocking the brim was far harder than the crown. With my brim block (which looks like a very funky toilet seat and sounds like a toilet cleaner - oh I was having so much fun with the toilet jokes last night) you have to pin the middle bit first to keep it in shape, then stretch it out over the whole of the brim. I was really struggling to get the pins in due to the angle. Pushing pins into wood isn't easy in the first place and my fingers are really sore today from it!
 But eventually it started to work. We removed most of the excess fabric and made a butted seam at the back. By the end of the session I'd blocked the brim and it was looking less toilet seat and more hat which was very satisfying. A lot of people didn't manage to get that finished and were feeling quite frustrated, and I can see why - it looks nothing like a hat then suddenly at the last minute it starts to make sense.
Next week we will put wire and ribbon round the brim to strengthen it, and start blocking the straw hood. Apparently that's quite a different process and gives very different results despite being done much the same way.
Firstly, I bought a straw hood this week in red and some petersham ribbon for the felt hat. I've got the ribbon in black for the inside (to stop the hat stretching) and royal blue for the edge of the brim to go with this coat: http://www.karenmillen.com/pws/images/catalogue/product/011CG00806/mann_medium/011CG00806.jpg
I knew exactly which block I wanted, but someone else got there first so I had to have a rethink. I ended up with this one (which I might like even better...)
He'd said that we could have a bit of variation in the size block we used when compared to our head sizes. I'm a 22" head and used a 22.5" block for the brim and am now using a 21" block for the brim - it adds up to quite a difference. I've had to put a seam in the back of my brim because of it (to take out the extra felt) but really can't see how it's all going to go together with such a massive difference...First job was to mark the cutting line on the crown and remove the brim. Very scary to make that first cut...Blocking the brim was far harder than the crown. With my brim block (which looks like a very funky toilet seat and sounds like a toilet cleaner - oh I was having so much fun with the toilet jokes last night) you have to pin the middle bit first to keep it in shape, then stretch it out over the whole of the brim. I was really struggling to get the pins in due to the angle. Pushing pins into wood isn't easy in the first place and my fingers are really sore today from it!
But eventually it started to work. We removed most of the excess fabric and made a butted seam at the back. By the end of the session I'd blocked the brim and it was looking less toilet seat and more hat which was very satisfying. A lot of people didn't manage to get that finished and were feeling quite frustrated, and I can see why - it looks nothing like a hat then suddenly at the last minute it starts to make sense. Next week we will put wire and ribbon round the brim to strengthen it, and start blocking the straw hood. Apparently that's quite a different process and gives very different results despite being done much the same way.
Monday, 26 January 2009
Project 8 - Pants - Update
After a very successful weekend I can report that the orange pair are FINISHED!!!
I made the bias binding and bound the legs of the yellow pair, but didn't think about stretch so they ended up really wide and i'm currenly unpicking them to redo that. Wonder what people thought on the train this morning?
I also need to unpick the brown pair and sew them together again introducing stretch.
I've learned so much the last few weeks and I'm really happy with how they're coming out. I reckon 2 more evenings and they'll be done (good thing too as I only have 3 evenings left!
Saturday, 24 January 2009
Project 9 - Heart Shirt - Update

It was just as easy as I'd hoped. Got some red jersey off the market (1.5m for £3 - gotta love the market guy who always gives more or charges less) and the leftover fringe from my christmas dress and really pleased with the outcome. If I did it again I'd make the heart a bit smaller though - it looked right when it was just the fabric cut out, but it's a bit large with the fringe as well
Project Number 9 - Heart Shirt
Just a quick one today - was flicking through the London Lite on the way home last night and saw this pic article here
Loving the t-shirt. Going out with my mum tonight so thought I'd have a go at it. Not much time with doing the pants, so am going to use an old t-shirt rather than starting from scratch, but reckon I could get something nice in an hour or so
Loving the t-shirt. Going out with my mum tonight so thought I'd have a go at it. Not much time with doing the pants, so am going to use an old t-shirt rather than starting from scratch, but reckon I could get something nice in an hour or so
Friday, 23 January 2009
Project 8 - Pants - Update
 Well, I've had an hour or so on them tonight - we'd organised a movie night for my scouts so I sat at the back and cut out the pieces for the other two patterns...
Then when I got home I made up the rest of the first pair, but without binding the legs yet...here's a photo for you...feeling very happy with how this pair's turned out and confident I can get most of this done this weekend...
Project 8 - Pants - Update
Right, a bit of an update...after the sewing machine breakage (now working better than ever with the spare part my daddy got me) life is moving decidedly back towards having time to SEW!!!
The birthday party is a week on Friday (and Saturday and Sunday) so I only have one weekend left to complete them. Got the pair that I've sewn the pattern onto sewn together (mostly) last night. Just need to put an edging on the legs, sew the crotch together and put the elastic on. Discovered that the pieces didn't fit, but had drawn marks all over the pants before taking them apart and realised that I needed to stretch the bum piece to make it fit to the side piece. That worked really well (I wasn't sure what I was doing, but made it up) and they're really starting to look like pants now.
Have looked up what I need to do for the legs and "bias binding" comes up a lot so I'm going to have a play with that. It looks fiddly but I figured if I did it fairly large it'll work ok. We'll see. (Going to make it out of the contrast fabric I've got)
And that's about it really...can't wait for tomorrow to get started!
Subscribe to:
Posts (Atom)
