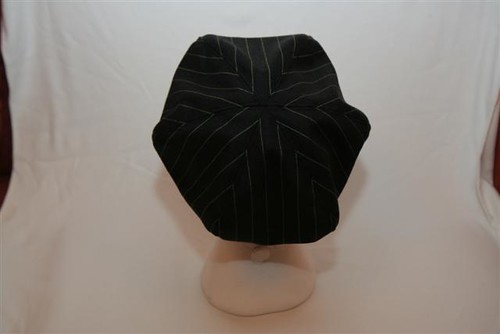
I'm very sorry for being so bad at coming and showing you all what's going on, but I'll make up for it by posting some photos at the weekend.
I've been taking the 'Millinery Trimmings & Fascinators' course at London College of Fashion and all my blogging time has been taken up by homework for this!
Our tutor is Thomas Von Nordheim and his teaching style really suits me. We're doing a sinamay and a covered buckram headpiece over the seven week course and although the first few lessons covered stuff I've done before, Thomas is fantastically approachable and really helpful, especially on a personal level.
I wanted to do the course because I feel that where my hats are now of a great standard and beautiful shapes, I really struggle with how to finish them. I see all these hats covered in feathers and 'frou frou' and feel like I should do the same. Thomas has listened to my style and my ideas and helped me to understand how I can do trimmings my own way. He's helped me to develop an amazing sinamay headpiece which I finished tonight. It's got a feather, but just one statement one and it's fantastic (can you tell I'm in love). This course has been so much more than I dreamed it could be and I really feel like I've found the next step in my hat making now.
Showing posts with label millinery. Show all posts
Showing posts with label millinery. Show all posts
Tuesday, 26 October 2010


Sunday, 6 June 2010
A beautiful cream silk mini-boater

This hat is a commission for a friend of a friend. She wanted something in cream and sent me a few pictures of some styles she liked. It left a huge amount of the design up to me. This was very exciting and I'm really pleased with how it's turned out.
The hat has been formed by blocking a shape in Buckram, a stiff fabric which can be formed when wet and then dried to keep that shape. I didn't have any blocks in the shape I wanted so used a metal wine cooler that was the perfect size for the crown.
The two-part shape was stitched together and has been covered with a silk taffeta in a warm cream with a slight shot of gold. This method of forming a base and covering it is a traditional millinery method that dates back hundreds of years. The only modern touch was to do part of the stitching on my sewing machine. Most of the stitching has been done by hand. A head band has been used to finish the inside, and a band of millinery petersham (ribbon) has been used to give a professional finish to the silk hat itself.
The flowers are formed by cutting individual petals out of silk organza and then stitching them around a bud formed from millinery wire and cotton wool. Each petal is curled before attaching it, which is how the rose shape is created. Due to the size of the flowers on the hat, I stuck to two roses. They have been accentuated with curled goose feathers. The flowers were made using a tutorial from Prudence Millinery. Well worth the money if you fancy trying it - a beautifuly put together tutorial with hundreds of very clear photos.
Finally, the head band is made from millinery wire and bent to the shape of the head to give a really comfortable fit. Well here's some close ups of it for you to enjoy.


Monday, 26 April 2010
Oh to have a hat for sale on Bond Street...
I received an invitation from Kensington & Chelsea College last week to submit a hat for selection by Fenwicks of Bond Street’s millinery buyer for sale or return at Fenwicks.
I find this really exciting as this was how I found out about the course I’ve just finished. I saw a note in Metro about the display in Fenwicks of student work, went to see it and was so impressed I applied for the course the next day. I dreamed at the time of one of my hats being there on show a in a subsequent display. Imagine if that could happen one short year later!
Now, there’s 2 problems. One is that the selection will be made on the 4th. I’m away at scout camp all weekend so that means I’ll have to deliver my hat by Friday this week! The second is which hat to sell? They suggest unusual without being quirky or weird. The sort of hat a lady can wear to Ascot or a wedding or a society event. Something that takes in current trends yet also stands out.
There’s only one piece that can meet these criteria. The coursework hat. But to be honest, the one I made may be my pride and joy, but it’s just not good enough for Fenwicks. There’s a few little glitches and imperfections that make it not quite good enough to sell.
So this weekend I started blocking a copy. But with differences. So it’s better. I’m going to have the opening at the front rather than the back so it’s more visible. And it’s going to be a little deeper and less tall to let a little more light in. I’ve stiffened the felt a lot more so it’s more structured and strong. And I’m going to support the shape all the way around with the wire so it holds better. I’m also going to do the mirrors differently, but I’m not 100% sure what I mean by that.
Well, I blocked the crown three times this weekend. I just can’t do it perfectly enough. But I think I’m mostly there now. My husband’s been amazing and said he’ll do all the shopping and cooking so I can get it done. I’m very excited but very very scared.
I find this really exciting as this was how I found out about the course I’ve just finished. I saw a note in Metro about the display in Fenwicks of student work, went to see it and was so impressed I applied for the course the next day. I dreamed at the time of one of my hats being there on show a in a subsequent display. Imagine if that could happen one short year later!
Now, there’s 2 problems. One is that the selection will be made on the 4th. I’m away at scout camp all weekend so that means I’ll have to deliver my hat by Friday this week! The second is which hat to sell? They suggest unusual without being quirky or weird. The sort of hat a lady can wear to Ascot or a wedding or a society event. Something that takes in current trends yet also stands out.
There’s only one piece that can meet these criteria. The coursework hat. But to be honest, the one I made may be my pride and joy, but it’s just not good enough for Fenwicks. There’s a few little glitches and imperfections that make it not quite good enough to sell.
So this weekend I started blocking a copy. But with differences. So it’s better. I’m going to have the opening at the front rather than the back so it’s more visible. And it’s going to be a little deeper and less tall to let a little more light in. I’ve stiffened the felt a lot more so it’s more structured and strong. And I’m going to support the shape all the way around with the wire so it holds better. I’m also going to do the mirrors differently, but I’m not 100% sure what I mean by that.
Well, I blocked the crown three times this weekend. I just can’t do it perfectly enough. But I think I’m mostly there now. My husband’s been amazing and said he’ll do all the shopping and cooking so I can get it done. I’m very excited but very very scared.
The last three weeks of my millinery course
I’ve had this post half-written for over a month now – really need to get it finished!!! I blame the new job, but I’m all nicely settled in now so should have more energy in the evenings to make things and tell you about them!
The last few weeks of my millinery course flew by. Firstly I finished blocking the blue flower hat. I’d forgotten to put cling film on the brim block and this taught me why. The felt stuck to the block and as I pulled it off I found it to be stained and damaged by the well-used block. It’s not too bad, and it’s on the underside of the brim so I can still finish the hat off, but it was an essential lesson to learn. I wired the brim and put the two pieces together and I fell in love. I love the huge brim and how it looks with the flower on the crown.
I also blocked a large black felt hat as a one-piece based on these Chanel adverts: (oh boy do I LOVE this Chanel collection – how I wish I had that kind of cash, or the ability to recreate some of these beautiful dresses and jackets) The shape’s pretty close – now I just need to get the brim wired and add some black satin ribbon and I’m off.
I had my tutorial. I turned up with all my research and design work, beautifully presented in a pair of stylish black folders. I’d spent what felt like forever up to my elbows in pritt stick at the weekend getting it all written up and was glowing with pride. Caroline seemed really happy with what I’d done, and especially with the printouts of my blog, showing everything I’d learnt in the course. So a really successful tutorial until the end when she asked where the finished hat was. WHAT??? But this is the DESIGN tutorial!!! I thought we had until the end of the course, the next tutorial, to do that. “Yes”, she replied. “The course ends next week!!!”
No pressure then to get the hat made from scratch. I blagged that I’d got it started (honest, gov – no-one believes you) and headed home a little early to get it started. I raided my felt stash for a hood (yes, I hadn’t even ordered the stuff for it) and stiffened it that night before bed. I spent the next couple of days blocking, eternally grateful for the practice pieces I’d done as I zipped around all the mistakes I’d made before. It took me until the Sunday night before it was finished, but I was absolutely thrilled with the results. It’s exactly like the design with the silk lining, the mirrors twinkling inside and a sense of adventure.
Caroline was really impressed in the class and suggested I found a way of entering it for competitions. WOW!
We ended the course with a group meal which was a great giggle. While we were in the restaurant, one of the waiting staff came up and asked if she could show her friend in the kitchen my hat. I was so thrilled that other people like it too. Almost happy enough to make up for the fact that there’s no more millinery course until September!!!
Wow – what an epic tale! Well, here’s the hat for your enjoyment...


The last few weeks of my millinery course flew by. Firstly I finished blocking the blue flower hat. I’d forgotten to put cling film on the brim block and this taught me why. The felt stuck to the block and as I pulled it off I found it to be stained and damaged by the well-used block. It’s not too bad, and it’s on the underside of the brim so I can still finish the hat off, but it was an essential lesson to learn. I wired the brim and put the two pieces together and I fell in love. I love the huge brim and how it looks with the flower on the crown.
I also blocked a large black felt hat as a one-piece based on these Chanel adverts: (oh boy do I LOVE this Chanel collection – how I wish I had that kind of cash, or the ability to recreate some of these beautiful dresses and jackets) The shape’s pretty close – now I just need to get the brim wired and add some black satin ribbon and I’m off.
I had my tutorial. I turned up with all my research and design work, beautifully presented in a pair of stylish black folders. I’d spent what felt like forever up to my elbows in pritt stick at the weekend getting it all written up and was glowing with pride. Caroline seemed really happy with what I’d done, and especially with the printouts of my blog, showing everything I’d learnt in the course. So a really successful tutorial until the end when she asked where the finished hat was. WHAT??? But this is the DESIGN tutorial!!! I thought we had until the end of the course, the next tutorial, to do that. “Yes”, she replied. “The course ends next week!!!”
No pressure then to get the hat made from scratch. I blagged that I’d got it started (honest, gov – no-one believes you) and headed home a little early to get it started. I raided my felt stash for a hood (yes, I hadn’t even ordered the stuff for it) and stiffened it that night before bed. I spent the next couple of days blocking, eternally grateful for the practice pieces I’d done as I zipped around all the mistakes I’d made before. It took me until the Sunday night before it was finished, but I was absolutely thrilled with the results. It’s exactly like the design with the silk lining, the mirrors twinkling inside and a sense of adventure.
Caroline was really impressed in the class and suggested I found a way of entering it for competitions. WOW!
We ended the course with a group meal which was a great giggle. While we were in the restaurant, one of the waiting staff came up and asked if she could show her friend in the kitchen my hat. I was so thrilled that other people like it too. Almost happy enough to make up for the fact that there’s no more millinery course until September!!!
Wow – what an epic tale! Well, here’s the hat for your enjoyment...


Friday, 19 February 2010
I got the call - my blocks are ready
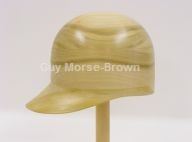
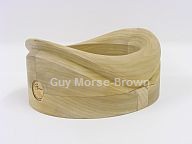
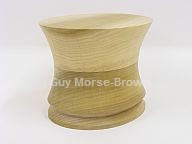
I ordered three hat blocks (a crown, a brim and a one-piece) as a special treat to myself when I handed in my notice here and accepted a new job.
And I just got the call to say they're ready and they're being sent out today!!! I should get them Monday!!!
There are no words to describe how excited I am right now!!!
Here they are a 2/3 size top hat and a cap...all from www.hatblocks.co.uk
Wednesday, 10 February 2010
2nd Millinery Course - Week 18
This week has been all about BRIMS. It’s a while since I’ve blocked a two-piece felt hat and I felt strangely excited by the whole thing! The felt’s a different colour, but at the moment this is all about the shapes so I’m trying not to let that distract my mind.
I was really pleased with my blocking of the brim. I know I’ve said it before on here, but all the blocking I’m doing (and I’m trying to do some every week) is resulting in a massive improvement of my work. I’m getting so neat that there weren’t any wrinkles at all, which made me very happy.

While that dried, I blocked a beautiful blue hood on a very funky crown block. There’s a flower shape on the edge of it, which I spent an age tracing out with blocking cane. That was really hard work and no matter what I did the cane seemed to move about. I’m not sure what the effect will be when it comes off the block, but I’m quite excited to see.

I removed the brim from the block and cut it out. When I got it home and put it with the crown it all seemed to slot into place. It’s exactly what I’d dreamed of (if a little/lot larger) and I’m really excited again about getting the details started and then getting onto the real thing!
I was really pleased with my blocking of the brim. I know I’ve said it before on here, but all the blocking I’m doing (and I’m trying to do some every week) is resulting in a massive improvement of my work. I’m getting so neat that there weren’t any wrinkles at all, which made me very happy.

While that dried, I blocked a beautiful blue hood on a very funky crown block. There’s a flower shape on the edge of it, which I spent an age tracing out with blocking cane. That was really hard work and no matter what I did the cane seemed to move about. I’m not sure what the effect will be when it comes off the block, but I’m quite excited to see.

I removed the brim from the block and cut it out. When I got it home and put it with the crown it all seemed to slot into place. It’s exactly what I’d dreamed of (if a little/lot larger) and I’m really excited again about getting the details started and then getting onto the real thing!
2nd Millinery Course - Week 17
 Dear me, I’ve been a bit rubbish at keeping this up to date, but I can finally confirm that that’s because I’ve got a new job!!!
 Now, onto the design development – I spent the week working on the crown design – creating a wire ‘cage’ and working out how best to line a hat. I continued this in last Monday’s lesson, ending with something I’m really really happy with. Words can’t describe, here’s a photo.
  I’m shocked that it actually looks so much like what I drew. I’m still concerned about the size – I love the shape, but it’s huge (I’ll have to get a photo of it on a head to show how big it really is). There doesn’t seem to be anything in the cupboard that’s the shape I’d imagined and a better size. I’m considering hiring a top hat block if I can find one.
 With that complete, I took the dinky purple patterned hat off the block and it looks fantastic.
 Next week I’m going to block a brim for the coursework hat as I still need to decide what I’m going to do with that.
Saturday, 23 January 2010
Productive day - and helping a friend


I have been sewing ALL DAY!!! I got up early and got started on my mum's hat, which I've finally finished (well, I want to add a button or something to the middle of it to hide where the feathers join, but mum's gone out to get that today.) It looks fantastic on her and really goes with her outfit. I'll get a picture of it all together next weekend at the wedding :D
Next job is something I really really want to tell you about, but it's a big secret, also for the wedding next weekend...so we'll all just have to wait...
Whilst working on my hat for the wedding, the felt and sinamay one, a friend called and asked if I could help her make a top for a burns night party tomorrow. She'd bought a metre of tartan fabric and had no idea where to start.

 I really enjoyed helping her out creating this. We took a dress pattern and shortened it to make a long top. I especially like how we added a bias strip round the bottom, which gives it a really funky look. I really enjoyed working with someone - I normally sew alone. And she did a fantastic job of it, especially as she'd never done anything like it before.
Saturday, 26 December 2009
Merry Christmas! & a Christmas Day Project
I hope everyone had a fantastic Christmas and feels as relaxed and contented as I do.
I had a wonderful day and got loads of hat books. The best one was Fashion Hats - Design & Make by Karen Henriksen - lots of fantastic ideas, tips and techniques and all really nicely laid out. Good for someone my level who knows the background and has confidence making the hats, but hasn't done much trimming yet.
 First I made a bias strip about the width of a DVD (what can I say, I used what I had to hand) and as long as the fabric could handle. Then I used and iron to stretch it and while it was warm I formed it into soft curls. I worked the curls into a ball shape and stitched it in position. I took several of the long feathers and laid them out in a circle. I used a piece of cotton to wrap around them where they met to make a fan shape out of them and then stitched this to the back of the sinamay ball. I then stitched the black feathers into the middle individually. Finally I attached the whole thing to a hair clip and popped it on my mum. I'm rather pleased with how it turned out.
I had a wonderful day and got loads of hat books. The best one was Fashion Hats - Design & Make by Karen Henriksen - lots of fantastic ideas, tips and techniques and all really nicely laid out. Good for someone my level who knows the background and has confidence making the hats, but hasn't done much trimming yet.

 First I made a bias strip about the width of a DVD (what can I say, I used what I had to hand) and as long as the fabric could handle. Then I used and iron to stretch it and while it was warm I formed it into soft curls. I worked the curls into a ball shape and stitched it in position. I took several of the long feathers and laid them out in a circle. I used a piece of cotton to wrap around them where they met to make a fan shape out of them and then stitched this to the back of the sinamay ball. I then stitched the black feathers into the middle individually. Finally I attached the whole thing to a hair clip and popped it on my mum. I'm rather pleased with how it turned out.
Tuesday, 8 December 2009
2nd Millinery Course - Week 12
I’ve been thinking more and more about my design and I think that, although I love the look of felt and love working with felt, it just doesn’t have the ‘occasion’ of sinamay. Plus I’m less confident working with sinamay and want to get more practice with it. So I decided that my challenge for last night was to block a two-piece in sinamay.
The problem is that I just don’t like the look of your classic sinamay hat, all mother of the bride and weddings and not what I’m aiming for. I had a wander round John Lewis and Milliner Warehouse for inspiration and decided to make a hat with a felt crown (so I can have another play at manipulation) and a sinamay brim, teaching me how to block that and attach it. To decorate, I’ll add a large flower motif in felt with sinamay swirls and wotnots to bring the two materials together. If it all works out well I’ll wear it to a wedding in January. To bring it in line with the dress, I’ll do decorative topstitching on all the decorative bits in the same colour thread as my dress.
 I picked up a fur felt in chocolate brown and some matching sinamay and was ready to go. Brown’s not really my thing, but I wanted to try manipulating with a fur felt and it was chocolate, pale brown or black. I figured the chocolate will go best with my dress.
First I blocked the brim. I chose and off-centre brim block, not too big, and found out very quickly that blocking a brim in sinamay is a LOT easier than blocking a crown!!! I guess that’s not much of a surprise really as the brim is pretty flat and the crown’s all curved and the sinamay’s flat, but I didn’t expect it to be that much easier. Although I did break my elastic doing it!!! I stiffened it with PVA and popped it in the oven to dry.
 I’d had an idea of a block with a fairly blocky top, kind of like this one from Morse Brown, but there was nothing like that in the cupboard so I decided to manipulate some folds into a dome shaped crown block. To fit the big floral thingy on the side I decided to just manipulate on one side. I have no idea what this is going to look like, but it’ll be exciting to find out.
 I steamed the hood and blocked it on a tall dome shaped crown. Then I put the centre crease in, the two next to it and then started to work down one side. I didn’t like how the front looked so I brought the creases down to form ‘v’s at the front. It’s a lot easier to manipulate the fur than the wool felt and the finished article is a lot more dramatic. I was really pleased with how it came out.
I popped that in the oven and removed the sinamay brim. It’s the last week of term and I’ll miss the first two weeks of next term because I’ll be in India so I have rushed everything off the blocks a lot quicker than I normally would. I hope that won’t affect the finished product too much. I tacked the line on the block that shows the head fitting, but there’s not much else I can do with that until it’s wired. I have found out that I need to cut out the head fitting about an inch in, put in darts and fold up the excess, then stitch it to the crown like that. I’m very nervous about doing that on my own the first time, but I’m sure it’ll be ok.
 So finally I removed the crown from the block and wobbled home overladen with precious very delicate things and getting far too much interest from random people on the tube. I hope to get this finished over the Christmas period – maybe I’ll devote next Monday night to it...
The problem is that I just don’t like the look of your classic sinamay hat, all mother of the bride and weddings and not what I’m aiming for. I had a wander round John Lewis and Milliner Warehouse for inspiration and decided to make a hat with a felt crown (so I can have another play at manipulation) and a sinamay brim, teaching me how to block that and attach it. To decorate, I’ll add a large flower motif in felt with sinamay swirls and wotnots to bring the two materials together. If it all works out well I’ll wear it to a wedding in January. To bring it in line with the dress, I’ll do decorative topstitching on all the decorative bits in the same colour thread as my dress.
 I picked up a fur felt in chocolate brown and some matching sinamay and was ready to go. Brown’s not really my thing, but I wanted to try manipulating with a fur felt and it was chocolate, pale brown or black. I figured the chocolate will go best with my dress.
First I blocked the brim. I chose and off-centre brim block, not too big, and found out very quickly that blocking a brim in sinamay is a LOT easier than blocking a crown!!! I guess that’s not much of a surprise really as the brim is pretty flat and the crown’s all curved and the sinamay’s flat, but I didn’t expect it to be that much easier. Although I did break my elastic doing it!!! I stiffened it with PVA and popped it in the oven to dry.
I’d had an idea of a block with a fairly blocky top, kind of like this one from Morse Brown, but there was nothing like that in the cupboard so I decided to manipulate some folds into a dome shaped crown block. To fit the big floral thingy on the side I decided to just manipulate on one side. I have no idea what this is going to look like, but it’ll be exciting to find out. I steamed the hood and blocked it on a tall dome shaped crown. Then I put the centre crease in, the two next to it and then started to work down one side. I didn’t like how the front looked so I brought the creases down to form ‘v’s at the front. It’s a lot easier to manipulate the fur than the wool felt and the finished article is a lot more dramatic. I was really pleased with how it came out.
I popped that in the oven and removed the sinamay brim. It’s the last week of term and I’ll miss the first two weeks of next term because I’ll be in India so I have rushed everything off the blocks a lot quicker than I normally would. I hope that won’t affect the finished product too much. I tacked the line on the block that shows the head fitting, but there’s not much else I can do with that until it’s wired. I have found out that I need to cut out the head fitting about an inch in, put in darts and fold up the excess, then stitch it to the crown like that. I’m very nervous about doing that on my own the first time, but I’m sure it’ll be ok.
 So finally I removed the crown from the block and wobbled home overladen with precious very delicate things and getting far too much interest from random people on the tube. I hope to get this finished over the Christmas period – maybe I’ll devote next Monday night to it...
Tuesday, 1 December 2009
2nd Millinery Course - Week 11
We had a different teacher this week – Gina Foster http://www.ginafoster.co.uk/. She’s going to be with us until at least Christmas as Caroline’s having an operation. I hope it all goes well and she heals quickly.

 We focussed today on sketching – simple quick sketches, stylised fashion drawings and realistic drawing. I’ve not had a drawing lesson since school (and I gave up art in year 9!!!) so didn’t have much faith in myself, but with the increased patience that age brings and quite a few hints and tips as we went along (plus a few things I remember from Art Attack) I was really pleased with my work.
First we drew a hat on a polystyrene head, focussing on proportions and shape. I took photos as I built up the picture (as this really is a brand new skill for me and far scarier than making the headwear) to record the process:
Then I did some sketching on my “theme” and came up with a few funky ideas, but I’m going to do some more work on them before I put them up.
Finally, I removed the red bowler hat from the blocks. This is the one I blocked the brim and crown together to give a one-piece rather than a two-piece. Where the elastic was sitting, there’s a very strong mark so I hope I can get that out as I wanted to make the most of my one-piece blocking by not having a band round the middle in the classic way. The crown definitely needs stiffening and I’ll wire the edge. I’m going to do a rolled edge on this one. Jenny & I had some fun and games with model poses (she’s much better at that than I am) at the end of the session.

 We focussed today on sketching – simple quick sketches, stylised fashion drawings and realistic drawing. I’ve not had a drawing lesson since school (and I gave up art in year 9!!!) so didn’t have much faith in myself, but with the increased patience that age brings and quite a few hints and tips as we went along (plus a few things I remember from Art Attack) I was really pleased with my work.
First we drew a hat on a polystyrene head, focussing on proportions and shape. I took photos as I built up the picture (as this really is a brand new skill for me and far scarier than making the headwear) to record the process:
Then I did some sketching on my “theme” and came up with a few funky ideas, but I’m going to do some more work on them before I put them up.
Finally, I removed the red bowler hat from the blocks. This is the one I blocked the brim and crown together to give a one-piece rather than a two-piece. Where the elastic was sitting, there’s a very strong mark so I hope I can get that out as I wanted to make the most of my one-piece blocking by not having a band round the middle in the classic way. The crown definitely needs stiffening and I’ll wire the edge. I’m going to do a rolled edge on this one. Jenny & I had some fun and games with model poses (she’s much better at that than I am) at the end of the session.

Tuesday, 24 November 2009
2nd Millinery Course - Week 10
Another week of tutorials and freedom to play about as much as we wanted to. When the teacher had been talking about making hats with crowns and brims, she’d said that it’s possible to block the crown and brim together rather than making a two-piece and sewing it together. Intrigued (as ever) I was determined to give it a go.
First off, I must admit that as the teacher was busy doing tutorials I went for the “bodger” approach and don’t know if what I did was right. We’ll have to see next week if it’s worked.
 First I steamed my hood (beautiful dark red wool felt this week) and blocked the crown. I used an elastic and pinned the excess to the underside to get it out the way but to keep it stretched. I picked a brim block that fitted around the crown and propped it all in place. I steamed the brim heavily and then stretched it over the brim, pinning the front, back and sides. Using more steam I stretched the felt all around the brim to make sure it was well stretched and straight. The whole thing was excessively fiddly, but not as time-consuming as I’d expected. The brim had a string groove in so I put a figure of eight knot in a piece of elasticated cord (the only thing I could find that wouldn’t snap) to make a sturdy slip-knot and pulled it tight around the groove. I steamed and pulled until I could see that the cord was making a good indentation.
 I also steamed the creases out of the hat I manipulated last week. When I took it off the block though, it is far far too tall! I think I’ll measure how tall I want the crown and cut it to make it a two-piece to bring the height down. I trimmed the brim (I’m really pleased with the manipulation I did on that last week) and decided that I’ll try a rolled edge on that when I wire it.
I was exhausted from a lack of sleep over the weekend so I decided I’d achieved enough and headed home early. I’ll try to get some more work in over the weekend ready for next week. I was disappointed to find out that the last class in December has been moved to early January – when I’ll be away. That means I’ll miss two classes instead of one :o(
First off, I must admit that as the teacher was busy doing tutorials I went for the “bodger” approach and don’t know if what I did was right. We’ll have to see next week if it’s worked.
 First I steamed my hood (beautiful dark red wool felt this week) and blocked the crown. I used an elastic and pinned the excess to the underside to get it out the way but to keep it stretched. I picked a brim block that fitted around the crown and propped it all in place. I steamed the brim heavily and then stretched it over the brim, pinning the front, back and sides. Using more steam I stretched the felt all around the brim to make sure it was well stretched and straight. The whole thing was excessively fiddly, but not as time-consuming as I’d expected. The brim had a string groove in so I put a figure of eight knot in a piece of elasticated cord (the only thing I could find that wouldn’t snap) to make a sturdy slip-knot and pulled it tight around the groove. I steamed and pulled until I could see that the cord was making a good indentation.
 I also steamed the creases out of the hat I manipulated last week. When I took it off the block though, it is far far too tall! I think I’ll measure how tall I want the crown and cut it to make it a two-piece to bring the height down. I trimmed the brim (I’m really pleased with the manipulation I did on that last week) and decided that I’ll try a rolled edge on that when I wire it.
I was exhausted from a lack of sleep over the weekend so I decided I’d achieved enough and headed home early. I’ll try to get some more work in over the weekend ready for next week. I was disappointed to find out that the last class in December has been moved to early January – when I’ll be away. That means I’ll miss two classes instead of one :o(
Thursday, 19 November 2009
Making an emergency 50s hat
Talking to my friend at work yesterday (the one who picked out the fantastic colours for my sinamay headpiece at college) she said she'd been invited to a fancy dress party and didn't know what to wear. And the party is TONIGHT!!! She'd decided on 50s with a pencil skirt and fitted top, but she was worried it wouldn't look like she'd made an effort.
Well, there's only one answer to that - any 50s outfit is topped off with a hat. So I offered to "knock her up" a little pillbox hat.
First question, what have I got enough of in my sewing room? The outfit is black and dark red. I have a red hood, but it's not been stiffened, and I'm not sure I can manage a felt hat in an evening...all my sinamay's the wrong colour...I could knock something together with buckram and cover it...the only black I have is polyester lining fabric - that won't stretch nicely, but I could go for this sort of style (this is a beautiful example from an etsy seller):
 I decided it "must" be possible to block buckram, but seeing as it's SO stiff I'd soak it in water first. Ended up with completely floppy buckram and a bowl of black water - hmmm maybe that's not the best way forwards...still, it blocked fairly easily (it doesn't have the open weave of sinamay so I didn't manage to get all the lumps and bumps out, but that's no problem as the pillbox would be less than half the height of the block and I had it pretty smooth down to there.
An hour later, after making a delicious roasted veg lasagne recipe here the buckram was still dripping wet (and dripping black all over my kitchen floor!) Out came the hair dryer and I discovered that if you use that on coloured drawing pins, the plastic covers fall off and your kitchen ends up looking like you've had a smartie-masacre!!!
But after all that, a beautiful pillbox shape. It twisted slightly (I guess that's because I only used one layer) so I wired the brim and that pulled into shape nicely.
I then traced the top of the block onto the black lining, added a seam allowance, cut a strip a little longer than the distance round the block and made a tube with the oval sewn to the top. I stitched the top into place so it stretched out, then ran several rows of running stitch down the tube.
When the running stitch was all done, I gathered the fabric and sewed it into place over the wire. It's not great, but it's pretty good for just a few hours' work in the evening (and on the train this morning) - I hope she likes it
Update: She loved it and here she is looking fabulous wearing it:

Well, there's only one answer to that - any 50s outfit is topped off with a hat. So I offered to "knock her up" a little pillbox hat.
First question, what have I got enough of in my sewing room? The outfit is black and dark red. I have a red hood, but it's not been stiffened, and I'm not sure I can manage a felt hat in an evening...all my sinamay's the wrong colour...I could knock something together with buckram and cover it...the only black I have is polyester lining fabric - that won't stretch nicely, but I could go for this sort of style (this is a beautiful example from an etsy seller):
I decided it "must" be possible to block buckram, but seeing as it's SO stiff I'd soak it in water first. Ended up with completely floppy buckram and a bowl of black water - hmmm maybe that's not the best way forwards...still, it blocked fairly easily (it doesn't have the open weave of sinamay so I didn't manage to get all the lumps and bumps out, but that's no problem as the pillbox would be less than half the height of the block and I had it pretty smooth down to there.An hour later, after making a delicious roasted veg lasagne recipe here the buckram was still dripping wet (and dripping black all over my kitchen floor!) Out came the hair dryer and I discovered that if you use that on coloured drawing pins, the plastic covers fall off and your kitchen ends up looking like you've had a smartie-masacre!!!
But after all that, a beautiful pillbox shape. It twisted slightly (I guess that's because I only used one layer) so I wired the brim and that pulled into shape nicely.
I then traced the top of the block onto the black lining, added a seam allowance, cut a strip a little longer than the distance round the block and made a tube with the oval sewn to the top. I stitched the top into place so it stretched out, then ran several rows of running stitch down the tube.
When the running stitch was all done, I gathered the fabric and sewed it into place over the wire. It's not great, but it's pretty good for just a few hours' work in the evening (and on the train this morning) - I hope she likes it
Update: She loved it and here she is looking fabulous wearing it:

Tuesday, 17 November 2009
2nd Millinery Course - Week 9
This week we started to have our individual tutorials. I printed off all my diary posts and added in some of the pictures of my research (not nearly enough it seems) along with the other bits I’ve done – spider diagrams, word association, analysis of individual pictures. Then I stuck it all in a folder, loaded up myself with bags of hats (I genuinely hadn’t realised how much I’d produced on the course so far) and proceeded to almost get it all to Fulham Broadway in one piece (a very nasty man tried to squeeze past me, squashed everything and then yelled at me)
I’d brought a hood with me to try some manipulation. First I blocked it on a rounded dome block, pulling it right down to the bottom. Then I released it, lifted it up a little and introduced a fold around the crown. I was going to do more, but I loved the simplicity of it so I pinned that in place and got to work on the brim.
I steamed the brim heavily then started to play with it to try all sorts of shapes. Eventually I settled on having it up on one side and down on the other, with an additional flick down at the top to keep it the right height. I steamed and stretched and compressed all over the place to make it look right and left it in the oven to dry. When it came out it looked like I hadn’t done all the steaming and stretching though – it was wrinkled up again!!!
While I was doing all that, I made up some bias binding in sinamay and started to bind the edge of my headpiece. I was surprised how easily the sinamay was worked around quite tight curves and how smart it looks as it's done.
I had my tutorial right at the end of the evening. The teacher seemed to like my folder, but expected far more photos and pictures and didn’t really look at the rest of the stuff I’d done. I guess I’m taking the wrong approach with my research, but the last time I did a project like this was at school so I know I’m a bit rusty. Oh well, I’ll try to go in a slightly different direction with it from now on.
PHOTOS TO FOLLOW - I'VE BROKEN MY COMPUTER AT HOME SO I'M GETTING A BIT BEHIND WITH THEM
I’d brought a hood with me to try some manipulation. First I blocked it on a rounded dome block, pulling it right down to the bottom. Then I released it, lifted it up a little and introduced a fold around the crown. I was going to do more, but I loved the simplicity of it so I pinned that in place and got to work on the brim.
I steamed the brim heavily then started to play with it to try all sorts of shapes. Eventually I settled on having it up on one side and down on the other, with an additional flick down at the top to keep it the right height. I steamed and stretched and compressed all over the place to make it look right and left it in the oven to dry. When it came out it looked like I hadn’t done all the steaming and stretching though – it was wrinkled up again!!!
While I was doing all that, I made up some bias binding in sinamay and started to bind the edge of my headpiece. I was surprised how easily the sinamay was worked around quite tight curves and how smart it looks as it's done.
I had my tutorial right at the end of the evening. The teacher seemed to like my folder, but expected far more photos and pictures and didn’t really look at the rest of the stuff I’d done. I guess I’m taking the wrong approach with my research, but the last time I did a project like this was at school so I know I’m a bit rusty. Oh well, I’ll try to go in a slightly different direction with it from now on.
PHOTOS TO FOLLOW - I'VE BROKEN MY COMPUTER AT HOME SO I'M GETTING A BIT BEHIND WITH THEM
Friday, 13 November 2009
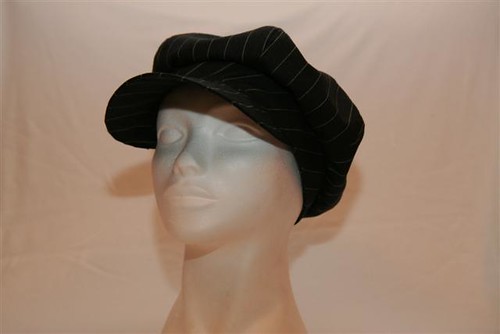
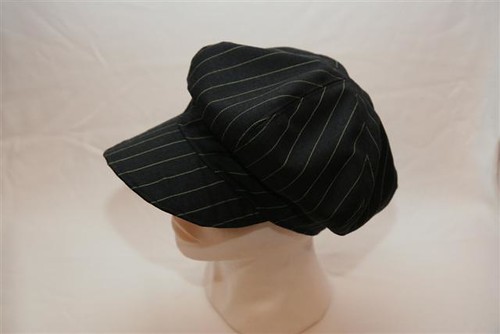
Pinstripe Baker Boy Hat
Someone at work provided me with some beautiful and incredibly luxurious woolen pinstripe in dark grey and lime green. She asked if I could make her a hat out of it, provided me with a sketch of what she was thinking and handed it over.
I made up a simple baker boy that I've made for myself a couple of times. I worked hard to get the pinstripes lining up and I love the effect that made. The head fitting band was a pain as I did it on the bias, causing it to stretch slightly. This caused the front to ruck up when I put it together, but I steam ironed it until it came back into shape.
Well, here's some pictures:


I made up a simple baker boy that I've made for myself a couple of times. I worked hard to get the pinstripes lining up and I love the effect that made. The head fitting band was a pain as I did it on the bias, causing it to stretch slightly. This caused the front to ruck up when I put it together, but I steam ironed it until it came back into shape.
Well, here's some pictures:

Wednesday, 11 November 2009
2nd Millinery Course - Week 8
So, we’re on the sinamay headpiece. I arrived and went straight for my work (wrapped up in a plastic bag to stop it fading) – it’s even more beautiful than I remember and I just LOVE the way it looks different colours in different directions. I had no idea when I decided to block more than one colour that it would look this good!
Anyway, enough of that. First we stiffened it by painting over it with a thin coating of PVA glue mixed with water (1/4 PVA and 3/4 water) and putting it back in the oven to dry. Another hat dripped on mine so when I took it out there was a big white splodge on it. I ironed it and the white splodge melted into nothing. Phew!
While we were waiting for them to dry, we made some bias binding and stretched it using the iron. A couple of us had sinamay that stretched massively, leaving us with very long very thin binding that couldn’t really be used for anything – a good lesson in testing before you do the real thing! I did manage to turn it into a very funky spring shape with the iron though, which looks fantastic. It sorts out the edges as well, which fray very easily. I might try using that technique on my hat!
The hats were now dry and we used pins to mark out the shapes we wanted to cut from them. There’s such a variety from classic kidney and tear drop shapes to punctuation marks. I love the v-shape that’s created when the sinamay is stretched when it’s blocked so I based my design on that.
With the design marked, we removed the sinamay from the block (still attached to the cling film) and cut it out. This was really scary – it’s very difficult to properly visualise the shape you’re cutting and you’re sort of trusting to faith. We bent wire into the same shape as we’d cut and stitched it to the edge – tie tacks first, then blanket stitch.
And that was as far as we got. I need to get my research and my diary printed out this week so that it can be put in my folder ready for a tutorial next week to review my progress. I’m strangely excited by that!
Anyway, enough of that. First we stiffened it by painting over it with a thin coating of PVA glue mixed with water (1/4 PVA and 3/4 water) and putting it back in the oven to dry. Another hat dripped on mine so when I took it out there was a big white splodge on it. I ironed it and the white splodge melted into nothing. Phew!
While we were waiting for them to dry, we made some bias binding and stretched it using the iron. A couple of us had sinamay that stretched massively, leaving us with very long very thin binding that couldn’t really be used for anything – a good lesson in testing before you do the real thing! I did manage to turn it into a very funky spring shape with the iron though, which looks fantastic. It sorts out the edges as well, which fray very easily. I might try using that technique on my hat!
The hats were now dry and we used pins to mark out the shapes we wanted to cut from them. There’s such a variety from classic kidney and tear drop shapes to punctuation marks. I love the v-shape that’s created when the sinamay is stretched when it’s blocked so I based my design on that.
With the design marked, we removed the sinamay from the block (still attached to the cling film) and cut it out. This was really scary – it’s very difficult to properly visualise the shape you’re cutting and you’re sort of trusting to faith. We bent wire into the same shape as we’d cut and stitched it to the edge – tie tacks first, then blanket stitch.
And that was as far as we got. I need to get my research and my diary printed out this week so that it can be put in my folder ready for a tutorial next week to review my progress. I’m strangely excited by that!
Thursday, 5 November 2009
Inspiration
I went to see Phantom of the Opera last night and the costumes were amazing. Yes, yes I know I'm supposed to just sit back and enjoy the show, but I couldn't take my eyes off the colours and the shapes. Plus the HATS!!! They were everywhere and gave me so many fantastic ideas. I came straight out and filled a few pages of my ideas book.
When I grow up I want to be a theatrical milliner!!!
When I grow up I want to be a theatrical milliner!!!
Tuesday, 3 November 2009
2nd Millinery Course - Week 7
Right, so after a break for half-term (I spent my Monday night in the audience for “I’m Sorry I Haven’t A Clue”) it’s back to work this week.
 I started the evening with my standard rush to Milliner Warehouse on the way to the course. I picked out two colours of sinamay – royal blue and gorgeous green. I’d been chatting with a friend at work about what colours to do and she’d suggested taking inspiration from a peacock feather – so I did. The two colours look fantastic together.
 After a bit of an introduction to sinamay, we started to block a crown shape. It’s totally different to working with straw or felt, mainly as you’re blocking a flat piece of fabric into a head shape, rather than starting with a hood. The technique is completely different too. I’m going to try to explain it without the benefit of photos as I forgot my camera (fool!!!), although I did take a photo of the finished product with a friend’s - oooh I've now blocked another one at home and put the pictures up to explain it.
 Right, so first you cut a square of the sinamay, slightly bigger than the block. You place it on the bias, so the corners are pointing to the front, back and sides of the block, pinning the four corners in place. Next you dampen it slightly, just spray a little water on your hands and rub it on the fabric, no more than that, and start to stretch it at the corners. This pulls the threads of the fabric from a right angle to a sharp “V” and as if by magic the fabric between the pins starts to pull tight.
 Now don’t get me wrong – it’s NOT that easy! It took everyone a while to get used to it and there was a lot of grunting, growling and swearing in the room. The sinamay’s pre-stiffened and the chemicals dry out your hands massively and the sharp ends of the fibres take a lot of the top layer of skin off – lovely stuff! But eventually you’ve got a head shape fairly smoothly. Great sense of achievement! Plus the amusement that every time you rub water onto the fabric it feels like you’re rubbing a bald head!!!
So, you iron the bald head to fuse the fibres together in their new funky positions, stand back and admire your handiwork. Not bad, but it looks a bit thin to be honest. Aha, that’s because you need 3 LAYERS of the stuff!!! Layer 2 is put on at 45degrees to the original and because of the way you’re now stretching across the straighter bits of the block seems to go on a lot easier. Iron that one and it sticks to the first layer – that’s the business. Then onto the third layer at the same angle as the first. Now we’re talking – this is still hard work, but it’s going much easier as you learn how the fibres move and work together.
I’d done mine with the blue on the first and third layers with the green in the middle and it looks fantastic. I’m so pleased with it. I popped it in the oven for half an hour and got a well-deserved cup of tea.
The rest of the session was spent on playing with manipulating the sinamay. We damped it slightly, put a little PVA glue on (to stiffen it as it dries) and rolled the edges of bias-cut sinamay. I made some bias binding (it’s so easy to manipulate – I did some pretty permanent-feeling folds by hand) and people had a play with making leaves and flowers and all sorts with what they had left over. So next week we’ll be stiffening the crowns and cutting them out into pretty shapes before decorating them.
 I started the evening with my standard rush to Milliner Warehouse on the way to the course. I picked out two colours of sinamay – royal blue and gorgeous green. I’d been chatting with a friend at work about what colours to do and she’d suggested taking inspiration from a peacock feather – so I did. The two colours look fantastic together.
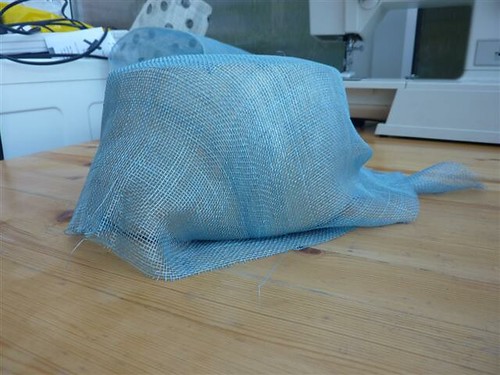 After a bit of an introduction to sinamay, we started to block a crown shape. It’s totally different to working with straw or felt, mainly as you’re blocking a flat piece of fabric into a head shape, rather than starting with a hood. The technique is completely different too. I’m going to try to explain it without the benefit of photos as I forgot my camera (fool!!!), although I did take a photo of the finished product with a friend’s - oooh I've now blocked another one at home and put the pictures up to explain it.
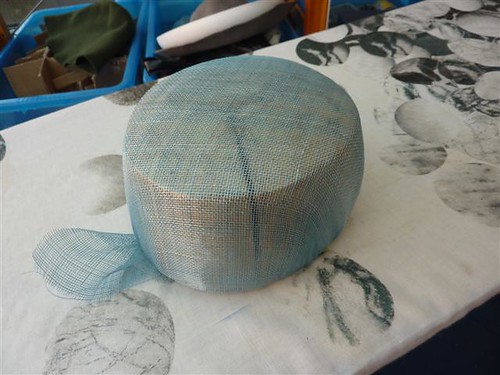 Right, so first you cut a square of the sinamay, slightly bigger than the block. You place it on the bias, so the corners are pointing to the front, back and sides of the block, pinning the four corners in place. Next you dampen it slightly, just spray a little water on your hands and rub it on the fabric, no more than that, and start to stretch it at the corners. This pulls the threads of the fabric from a right angle to a sharp “V” and as if by magic the fabric between the pins starts to pull tight.
 Now don’t get me wrong – it’s NOT that easy! It took everyone a while to get used to it and there was a lot of grunting, growling and swearing in the room. The sinamay’s pre-stiffened and the chemicals dry out your hands massively and the sharp ends of the fibres take a lot of the top layer of skin off – lovely stuff! But eventually you’ve got a head shape fairly smoothly. Great sense of achievement! Plus the amusement that every time you rub water onto the fabric it feels like you’re rubbing a bald head!!!
So, you iron the bald head to fuse the fibres together in their new funky positions, stand back and admire your handiwork. Not bad, but it looks a bit thin to be honest. Aha, that’s because you need 3 LAYERS of the stuff!!! Layer 2 is put on at 45degrees to the original and because of the way you’re now stretching across the straighter bits of the block seems to go on a lot easier. Iron that one and it sticks to the first layer – that’s the business. Then onto the third layer at the same angle as the first. Now we’re talking – this is still hard work, but it’s going much easier as you learn how the fibres move and work together.
I’d done mine with the blue on the first and third layers with the green in the middle and it looks fantastic. I’m so pleased with it. I popped it in the oven for half an hour and got a well-deserved cup of tea.
The rest of the session was spent on playing with manipulating the sinamay. We damped it slightly, put a little PVA glue on (to stiffen it as it dries) and rolled the edges of bias-cut sinamay. I made some bias binding (it’s so easy to manipulate – I did some pretty permanent-feeling folds by hand) and people had a play with making leaves and flowers and all sorts with what they had left over. So next week we’ll be stiffening the crowns and cutting them out into pretty shapes before decorating them.
Tuesday, 20 October 2009
2nd Millinery Course - Week 6
In the words of Kasabian, “I’m on fiiiiiiiiiiiiiii-rrrrrrrrrrrrre” – I had a brilliant evening last night and even finished one of my hats!
 Since last week, I’ve been stitching the cord made from the blue felt as neatly as I possibly can. I’ve also been playing with it – knotting it, twisting it, holding it against the hat, trying to work out what I want to do with it. My favourite was a figure of eight knot, which I steamed into place at the start of the class. I had planned to run the rest of the cord around the hat and weave it back through the knot, but when I pinned everything in place that just didn’t look right. I played around until I had found the right position, pinned it all there and started to make holes to thread the cord through.
 I tried that on a scrap first – different shaped holes and how they worked with the felt stuck through them. I found that making a cross shape worked best, as long as the flaps ended up on the wrong side of the fabric. I marked my locations and off I went. It was really scary to make the first cut, but as soon as I started threading the cord through I was thrilled with the effect. I’d decided to thread in and out based on where the shape goes out and it looks (if I may say so myself) fantastic. Finally I stitched the knot and ‘tail’ in place, trimmed the tail and made the ends look funky (devil tails according to someone at work). I’m really really pleased with how it has come out and really proud of myself for doing something a little out of the ordinary for once.
 Next up, I started blocking a beret. I hadn’t expected to finish what I was doing so quickly so I ‘borrowed’ a black hood off someone and blocked it. I was really pleased with how well it went – it blocked very quickly and I didn’t have very much hassle with the rolled edge – I managed to shrink the felt into it far quicker and easier than I ever have before. I need to have a think about what I want to do to decorate this one.
 And finally, we all made up some samplers of tie-tacking wire to the felt, stitching the wire on with a blanket stitch and covering an edge with petersham. I did all the stitching in contrast colours to make it clear on the samples, but was really proud of myself that I could barely see the stitching on the petersham, even though I’d sewn white thread onto black petersham!!!
So, an incredibly successful week. Next week’s half term so there’s not class, but I intend to use the time to get all my planning, research and design work written up. And an early night on a Monday – it’s a mission getting home from Chelsea!!!
Since last week, I’ve been stitching the cord made from the blue felt as neatly as I possibly can. I’ve also been playing with it – knotting it, twisting it, holding it against the hat, trying to work out what I want to do with it. My favourite was a figure of eight knot, which I steamed into place at the start of the class. I had planned to run the rest of the cord around the hat and weave it back through the knot, but when I pinned everything in place that just didn’t look right. I played around until I had found the right position, pinned it all there and started to make holes to thread the cord through.I tried that on a scrap first – different shaped holes and how they worked with the felt stuck through them. I found that making a cross shape worked best, as long as the flaps ended up on the wrong side of the fabric. I marked my locations and off I went. It was really scary to make the first cut, but as soon as I started threading the cord through I was thrilled with the effect. I’d decided to thread in and out based on where the shape goes out and it looks (if I may say so myself) fantastic. Finally I stitched the knot and ‘tail’ in place, trimmed the tail and made the ends look funky (devil tails according to someone at work). I’m really really pleased with how it has come out and really proud of myself for doing something a little out of the ordinary for once.Next up, I started blocking a beret. I hadn’t expected to finish what I was doing so quickly so I ‘borrowed’ a black hood off someone and blocked it. I was really pleased with how well it went – it blocked very quickly and I didn’t have very much hassle with the rolled edge – I managed to shrink the felt into it far quicker and easier than I ever have before. I need to have a think about what I want to do to decorate this one.And finally, we all made up some samplers of tie-tacking wire to the felt, stitching the wire on with a blanket stitch and covering an edge with petersham. I did all the stitching in contrast colours to make it clear on the samples, but was really proud of myself that I could barely see the stitching on the petersham, even though I’d sewn white thread onto black petersham!!!So, an incredibly successful week. Next week’s half term so there’s not class, but I intend to use the time to get all my planning, research and design work written up. And an early night on a Monday – it’s a mission getting home from Chelsea!!!
Subscribe to:
Posts (Atom)