 I started the evening with my standard rush to Milliner Warehouse on the way to the course. I picked out two colours of sinamay – royal blue and gorgeous green. I’d been chatting with a friend at work about what colours to do and she’d suggested taking inspiration from a peacock feather – so I did. The two colours look fantastic together.
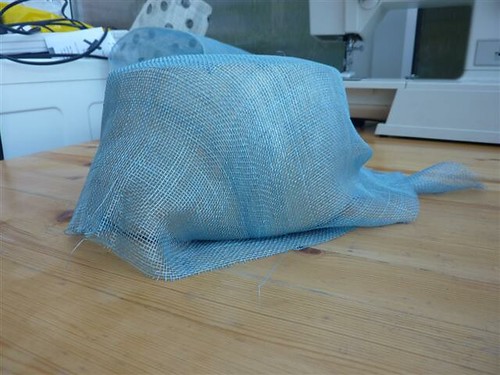 After a bit of an introduction to sinamay, we started to block a crown shape. It’s totally different to working with straw or felt, mainly as you’re blocking a flat piece of fabric into a head shape, rather than starting with a hood. The technique is completely different too. I’m going to try to explain it without the benefit of photos as I forgot my camera (fool!!!), although I did take a photo of the finished product with a friend’s - oooh I've now blocked another one at home and put the pictures up to explain it.
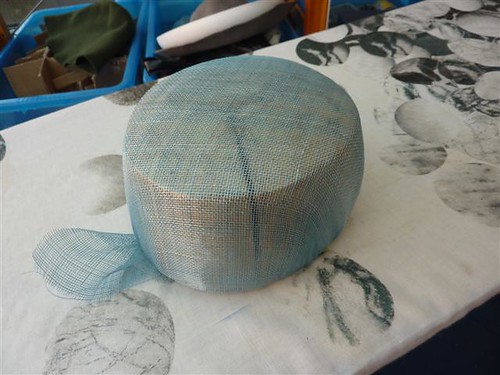 Right, so first you cut a square of the sinamay, slightly bigger than the block. You place it on the bias, so the corners are pointing to the front, back and sides of the block, pinning the four corners in place. Next you dampen it slightly, just spray a little water on your hands and rub it on the fabric, no more than that, and start to stretch it at the corners. This pulls the threads of the fabric from a right angle to a sharp “V” and as if by magic the fabric between the pins starts to pull tight.
 Now don’t get me wrong – it’s NOT that easy! It took everyone a while to get used to it and there was a lot of grunting, growling and swearing in the room. The sinamay’s pre-stiffened and the chemicals dry out your hands massively and the sharp ends of the fibres take a lot of the top layer of skin off – lovely stuff! But eventually you’ve got a head shape fairly smoothly. Great sense of achievement! Plus the amusement that every time you rub water onto the fabric it feels like you’re rubbing a bald head!!!
So, you iron the bald head to fuse the fibres together in their new funky positions, stand back and admire your handiwork. Not bad, but it looks a bit thin to be honest. Aha, that’s because you need 3 LAYERS of the stuff!!! Layer 2 is put on at 45degrees to the original and because of the way you’re now stretching across the straighter bits of the block seems to go on a lot easier. Iron that one and it sticks to the first layer – that’s the business. Then onto the third layer at the same angle as the first. Now we’re talking – this is still hard work, but it’s going much easier as you learn how the fibres move and work together.
I’d done mine with the blue on the first and third layers with the green in the middle and it looks fantastic. I’m so pleased with it. I popped it in the oven for half an hour and got a well-deserved cup of tea.
The rest of the session was spent on playing with manipulating the sinamay. We damped it slightly, put a little PVA glue on (to stiffen it as it dries) and rolled the edges of bias-cut sinamay. I made some bias binding (it’s so easy to manipulate – I did some pretty permanent-feeling folds by hand) and people had a play with making leaves and flowers and all sorts with what they had left over. So next week we’ll be stiffening the crowns and cutting them out into pretty shapes before decorating them.


 Since last week, I’ve been stitching the cord made from the blue felt as neatly as I possibly can. I’ve also been playing with it – knotting it, twisting it, holding it against the hat, trying to work out what I want to do with it. My favourite was a figure of eight knot, which I steamed into place at the start of the class. I had planned to run the rest of the cord around the hat and weave it back through the knot, but when I pinned everything in place that just didn’t look right. I played around until I had found the right position, pinned it all there and started to make holes to thread the cord through.
 I tried that on a scrap first – different shaped holes and how they worked with the felt stuck through them. I found that making a cross shape worked best, as long as the flaps ended up on the wrong side of the fabric. I marked my locations and off I went. It was really scary to make the first cut, but as soon as I started threading the cord through I was thrilled with the effect. I’d decided to thread in and out based on where the shape goes out and it looks (if I may say so myself) fantastic. Finally I stitched the knot and ‘tail’ in place, trimmed the tail and made the ends look funky (devil tails according to someone at work). I’m really really pleased with how it has come out and really proud of myself for doing something a little out of the ordinary for once.
 Next up, I started blocking a beret. I hadn’t expected to finish what I was doing so quickly so I ‘borrowed’ a black hood off someone and blocked it. I was really pleased with how well it went – it blocked very quickly and I didn’t have very much hassle with the rolled edge – I managed to shrink the felt into it far quicker and easier than I ever have before. I need to have a think about what I want to do to decorate this one.
 And finally, we all made up some samplers of tie-tacking wire to the felt, stitching the wire on with a blanket stitch and covering an edge with petersham. I did all the stitching in contrast colours to make it clear on the samples, but was really proud of myself that I could barely see the stitching on the petersham, even though I’d sewn white thread onto black petersham!!!